In Alpha, we ran two experiments to understand how schools might add school placements:
- Experiment 1a: Adding school placements if you’re a school
- Experiment 2a: Iterating how schools add school placements
Based on these experiments, we refined the journey for schools to add their placements to Manage school placements (Placements).
We still have some unanswered questions, such as:
- what constitutes a school placement?
- what is the lifecycle of a school placement?
- when do schools create placements and share them with their partner providers?
- is there a difference between the placements schools create for their partner providers versus any provider?
How it works
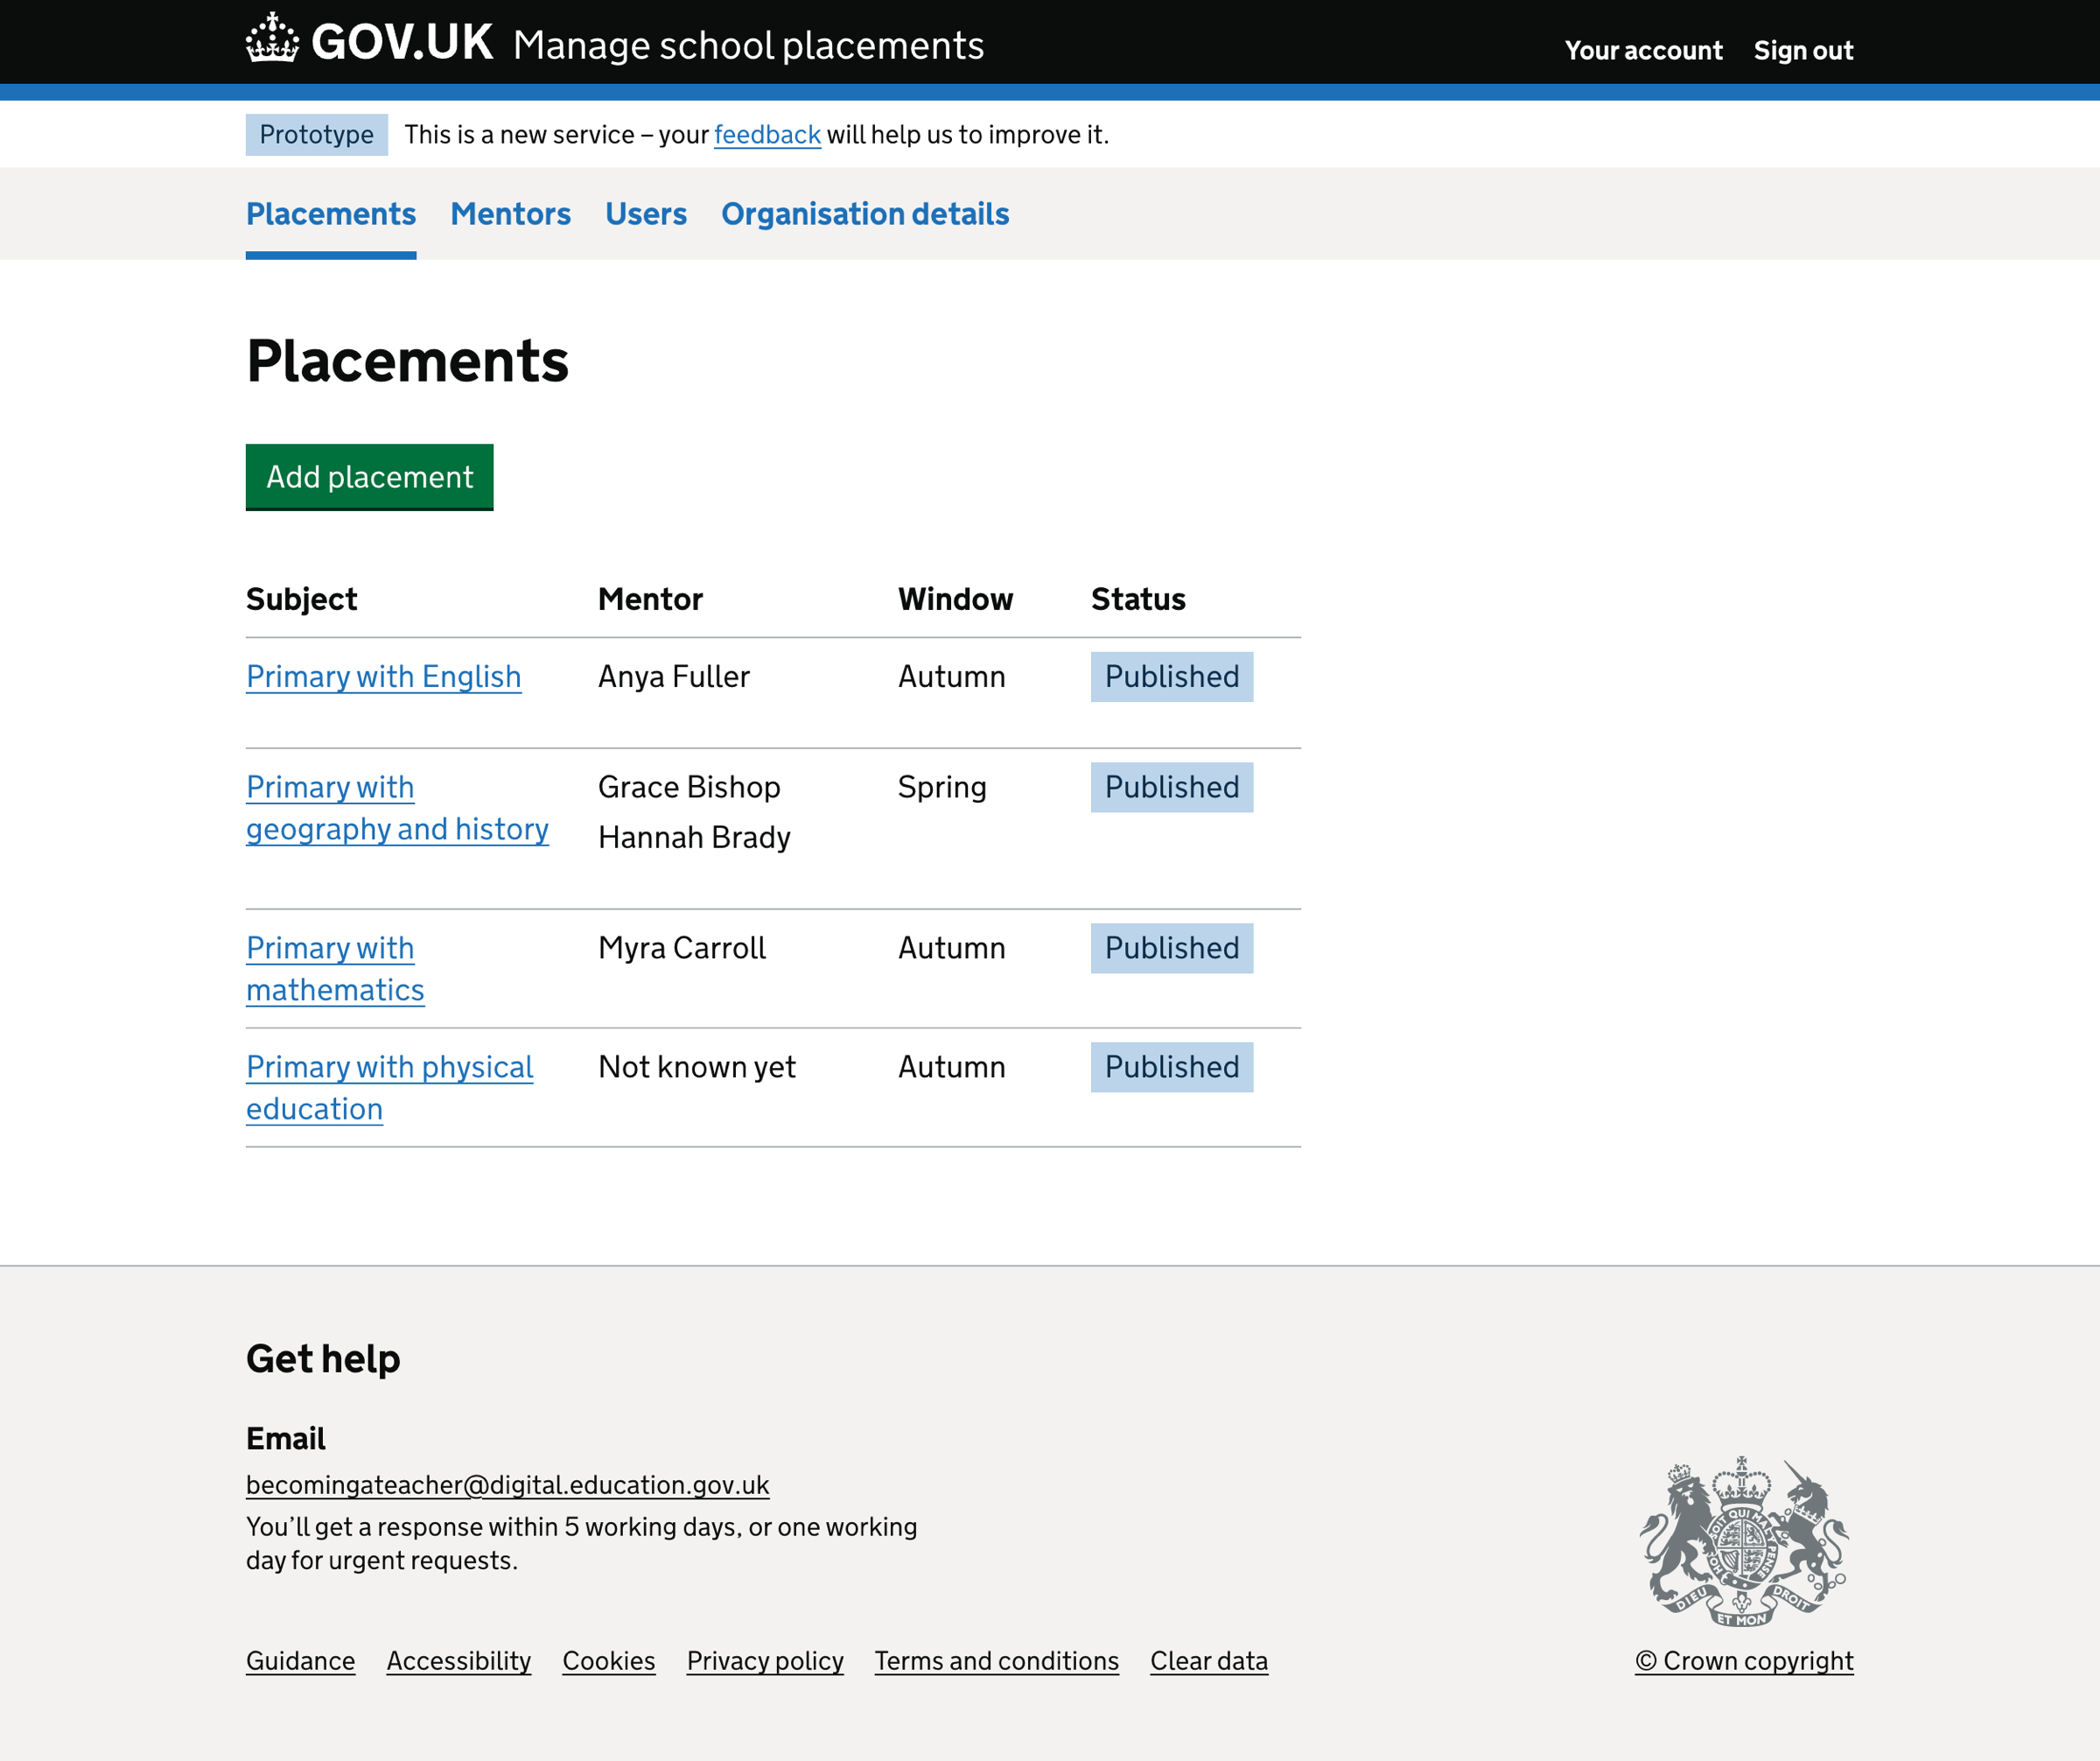
Placement list
On the placements list page, we show:
- an ‘Add placement’ button
- a list of placements in alphabetical order - ordered by subject
For each placement in the list, we show:
- subject(s) - including a link to the placement details page
- mentor name
- window
- status
We paginate the list if the placements list contains more than 25 placements.
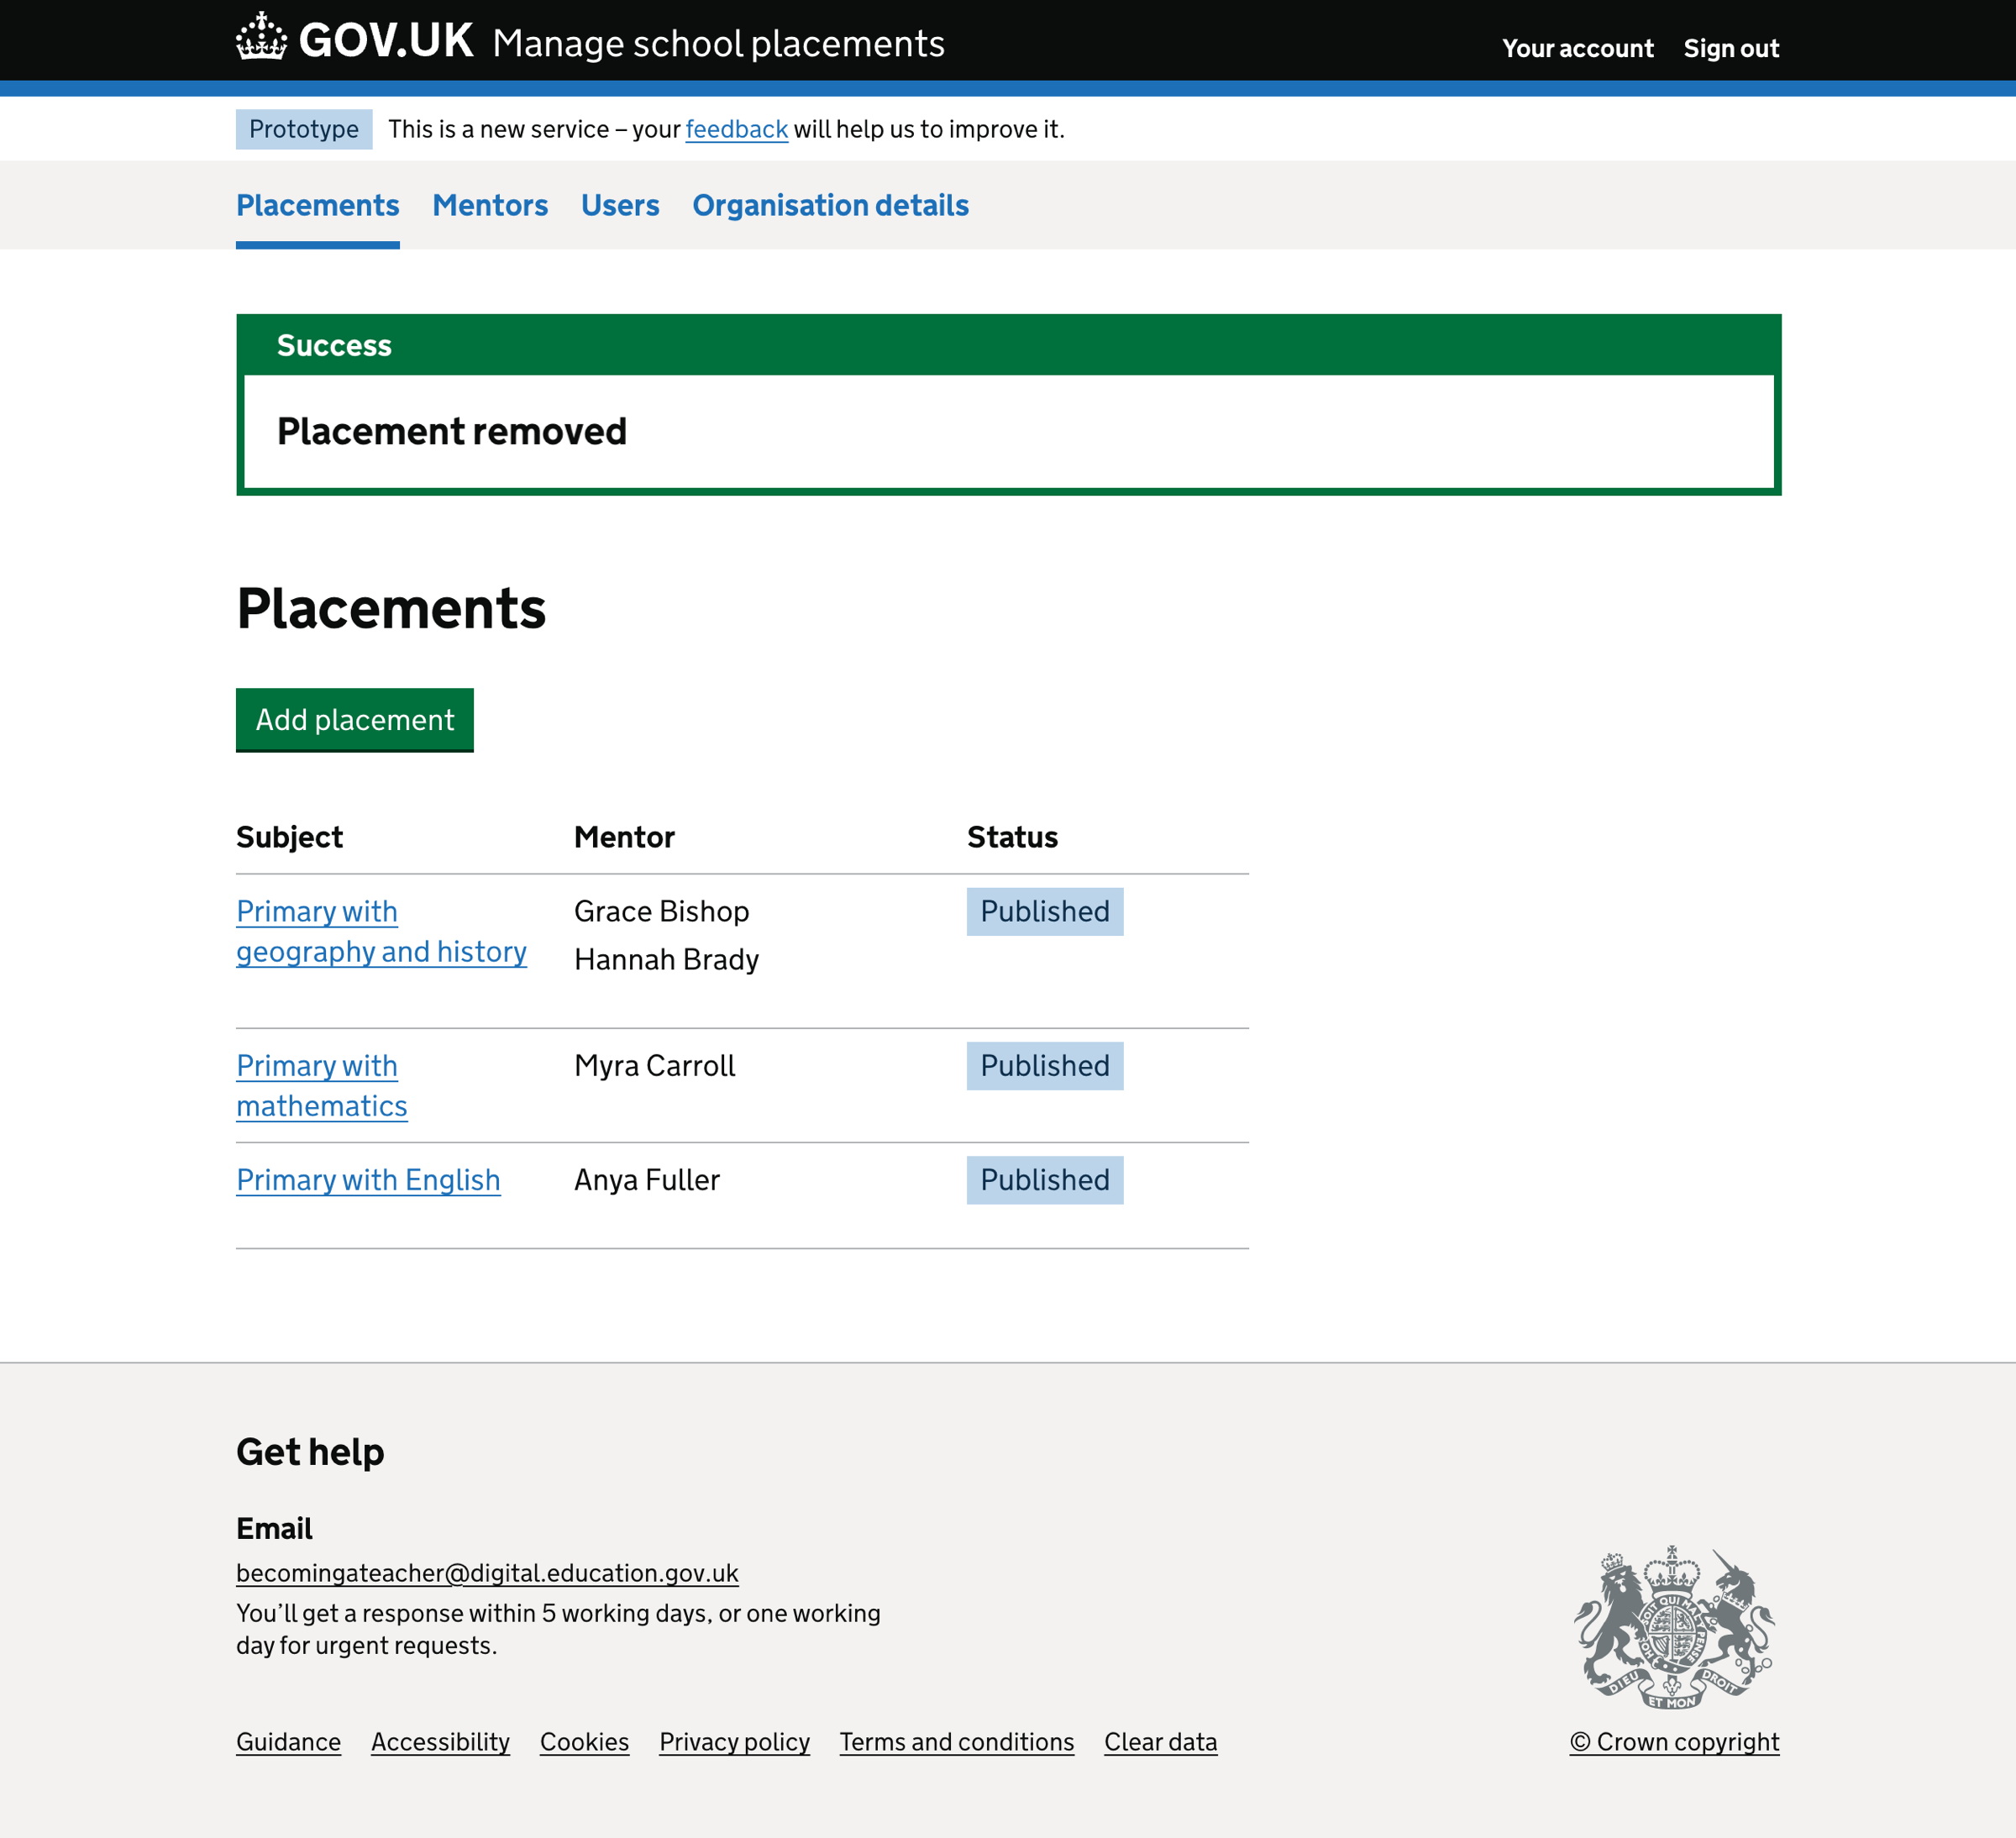
When users add or remove placements, we show a success message above the page heading.
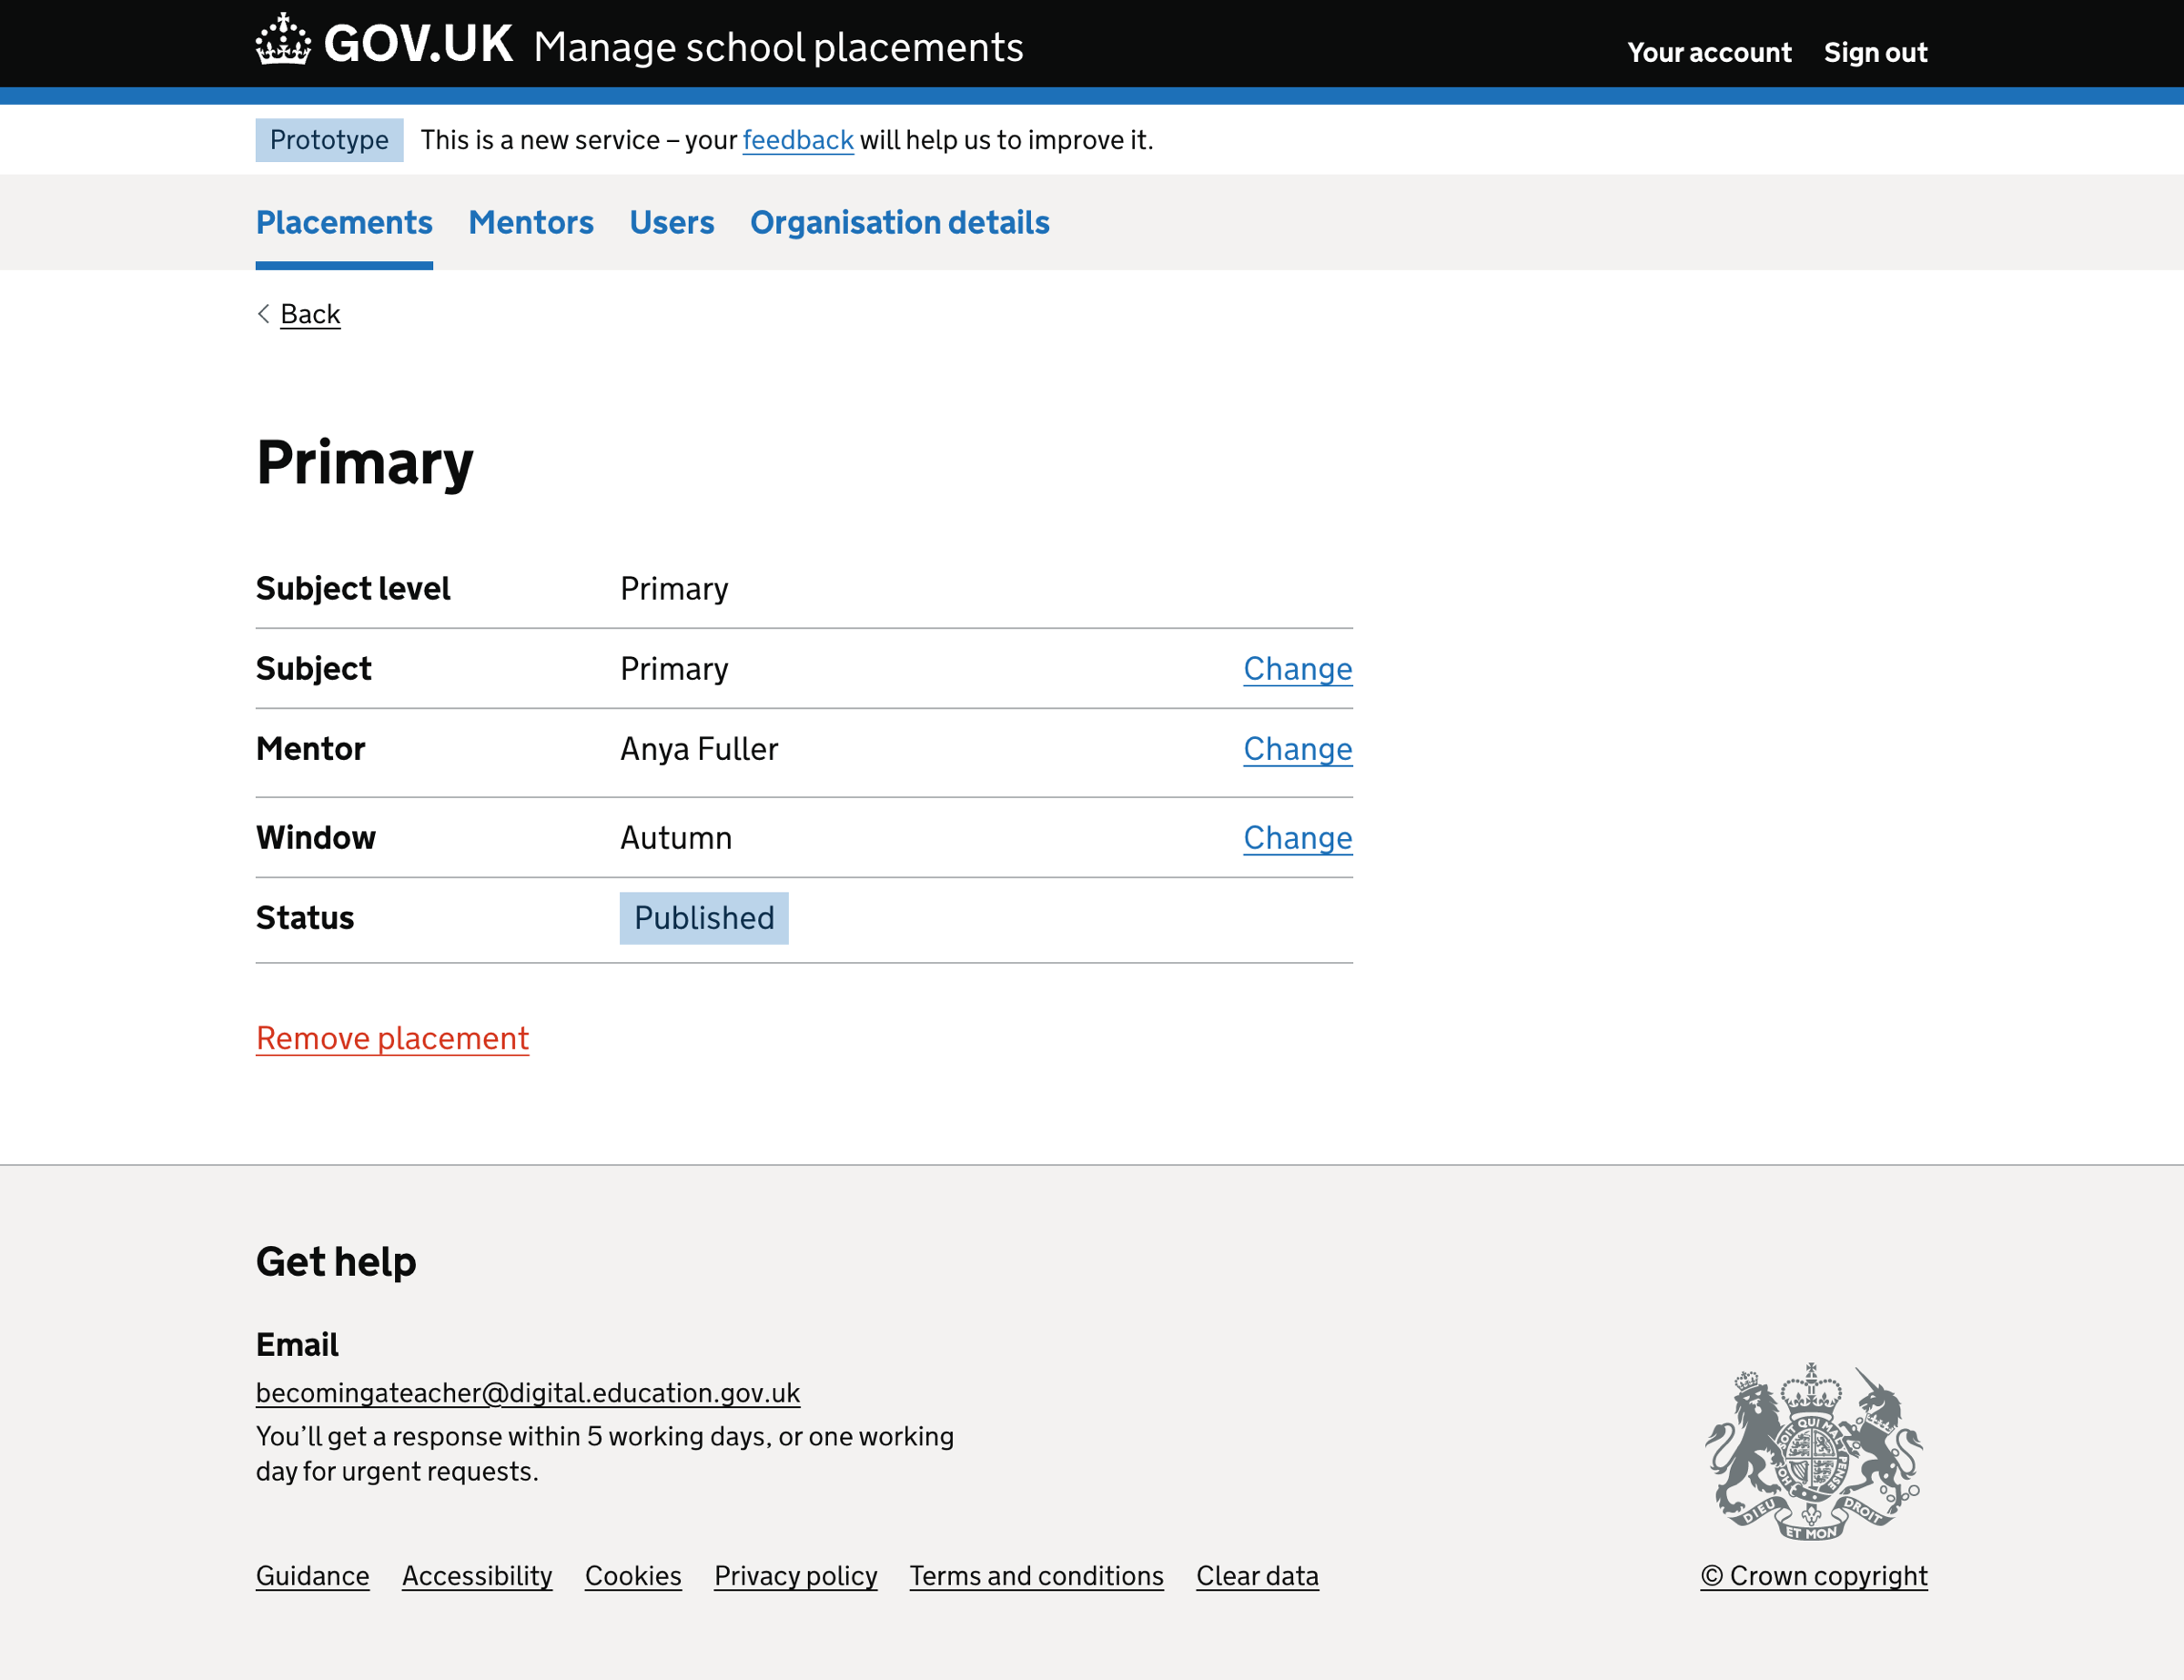
Placement details
On the placement details page, we show a summary list of the placement details, including:
- subject level
- subject
- mentor
- window
Users can change:
- subject
- mentor
- window
Users cannot change the subject level.
This page also includes a ‘Remove placement’ link, which allows users to delete the placement.
Adding a placement
Selecting ‘Add placement’ starts the add placement flow.
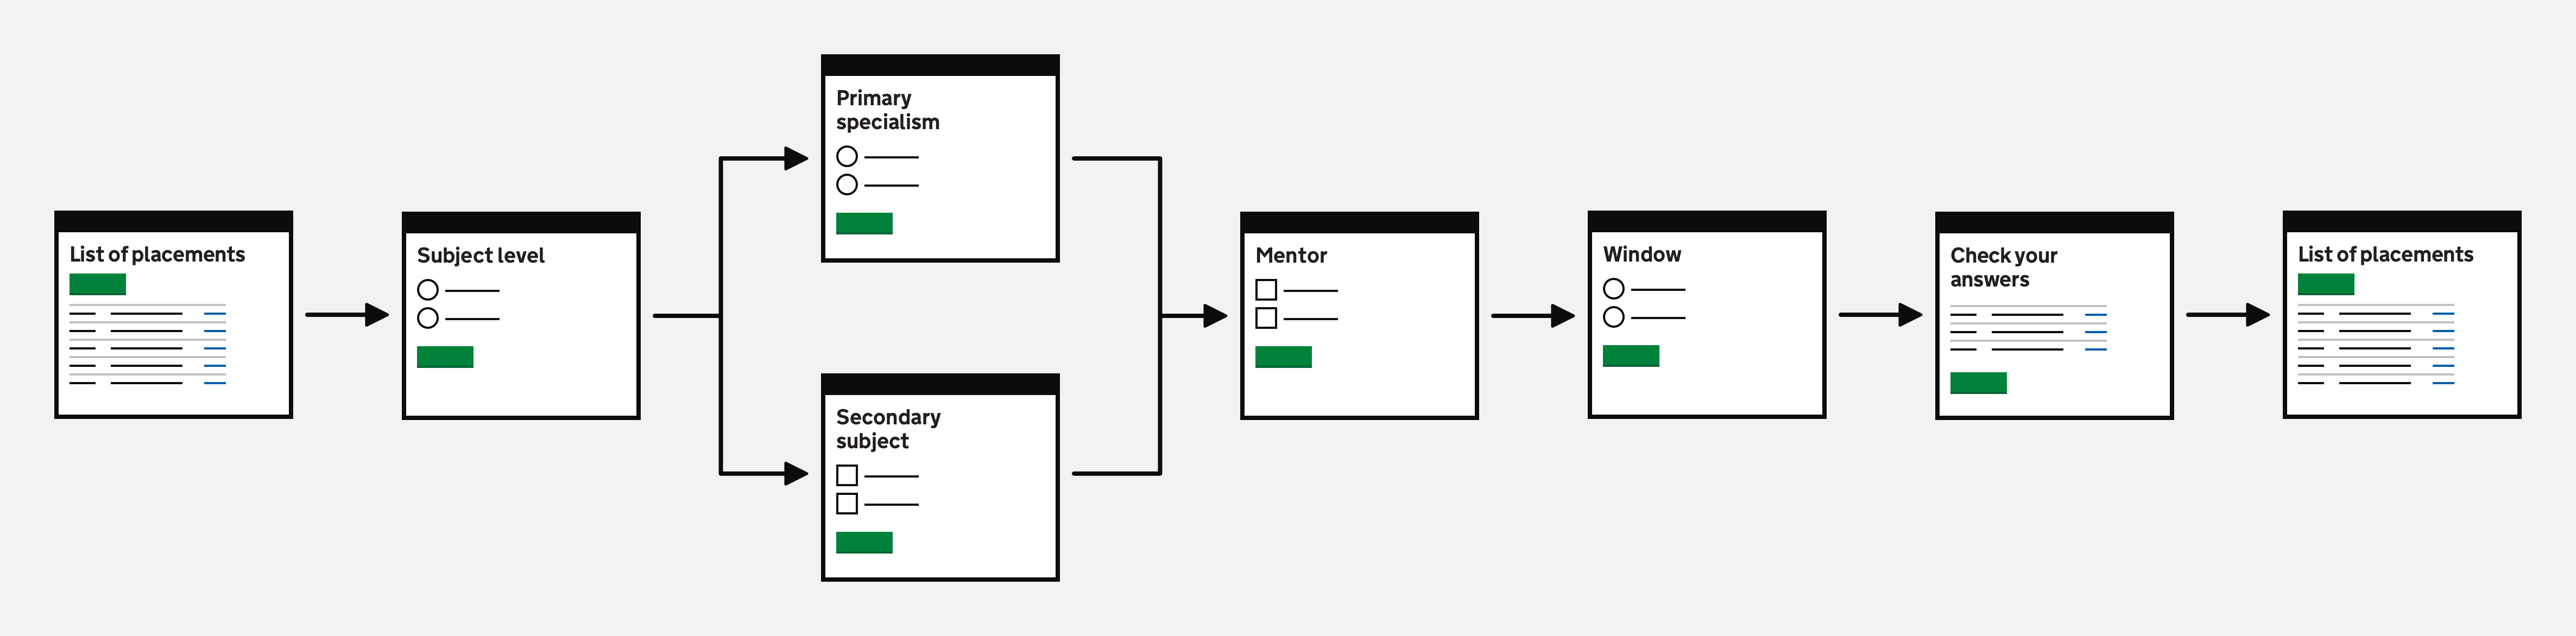
The ‘Add placement’ flow has five steps:
- Subject level - if the school’s education phase is not primary or secondary
- Subject
- Mentor
- Window
- Check your answers
Users can cancel out of the flow at any time using the ‘Cancel’ link. If they do so, we do not save their progress and return them to the list of placements.
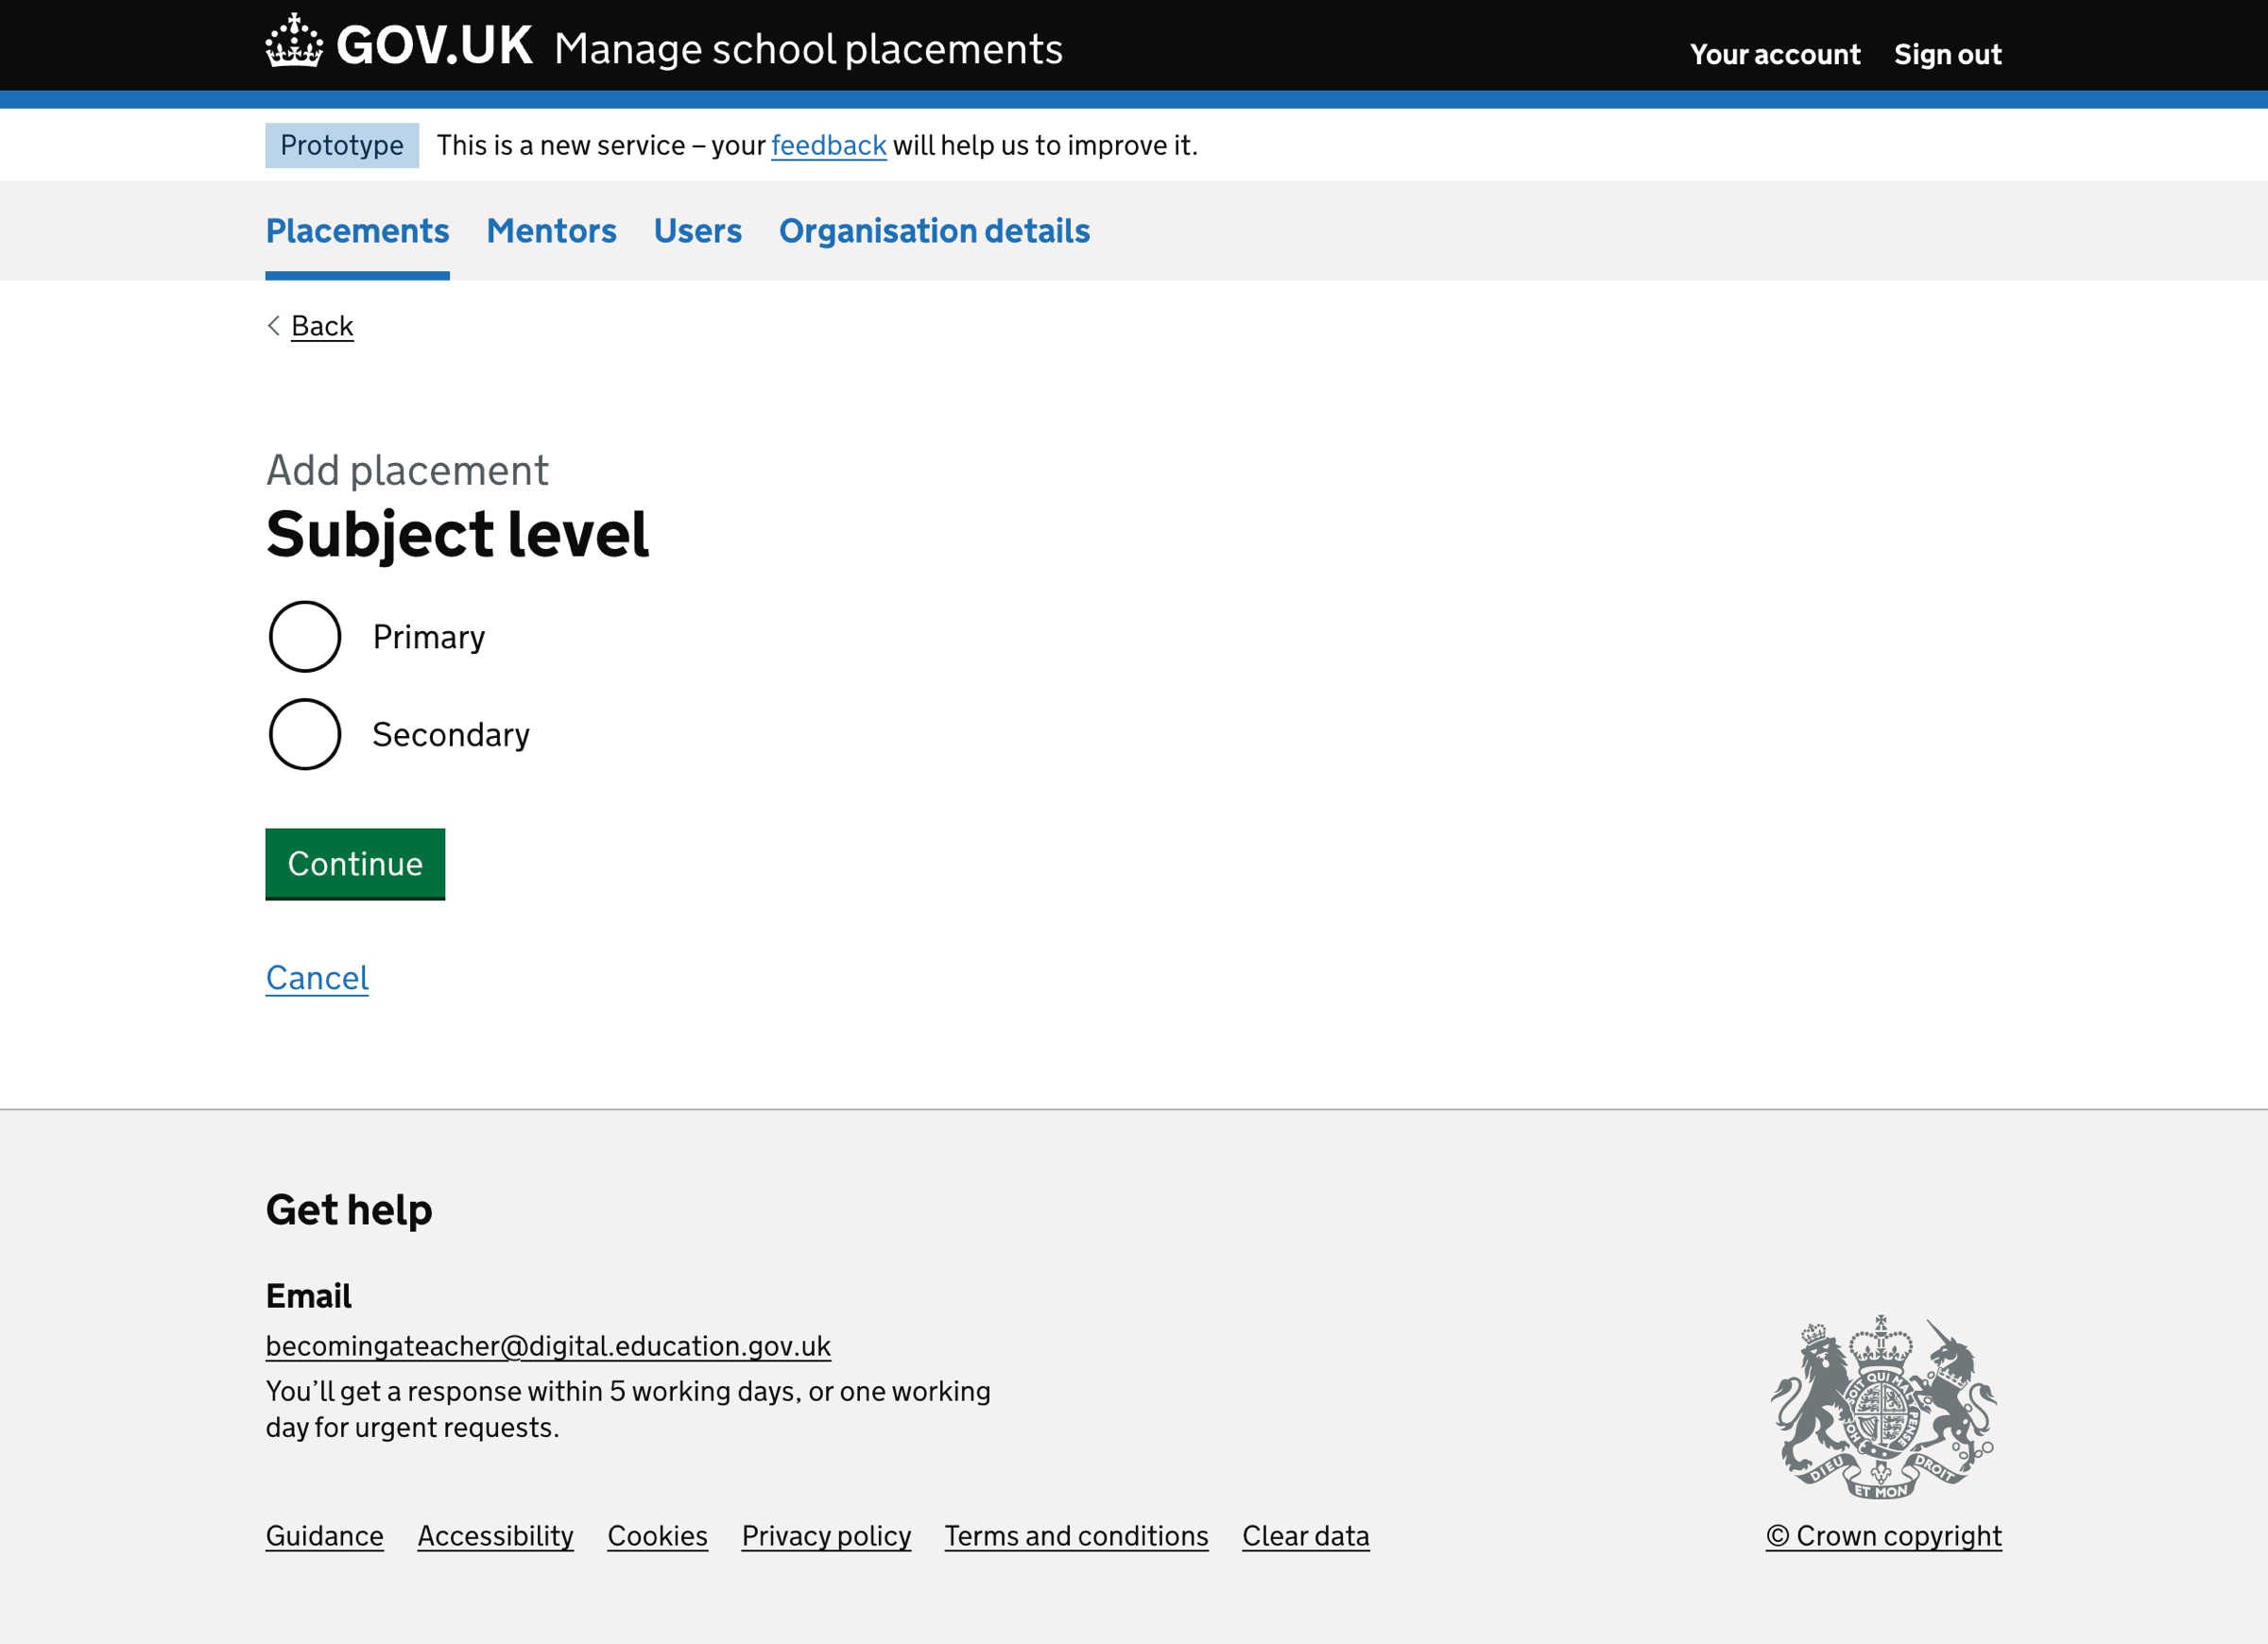
Subject level
The first step in the ‘Add placement’ flow is to select the subject level.
The subject levels include:
- primary
- secondary
We show the subject level options as radio buttons.
We do not ask this question if the school’s education phase is primary or secondary. In this case, we default the answer to the school’s education phase and move the user straight to the appropriate list of subjects.
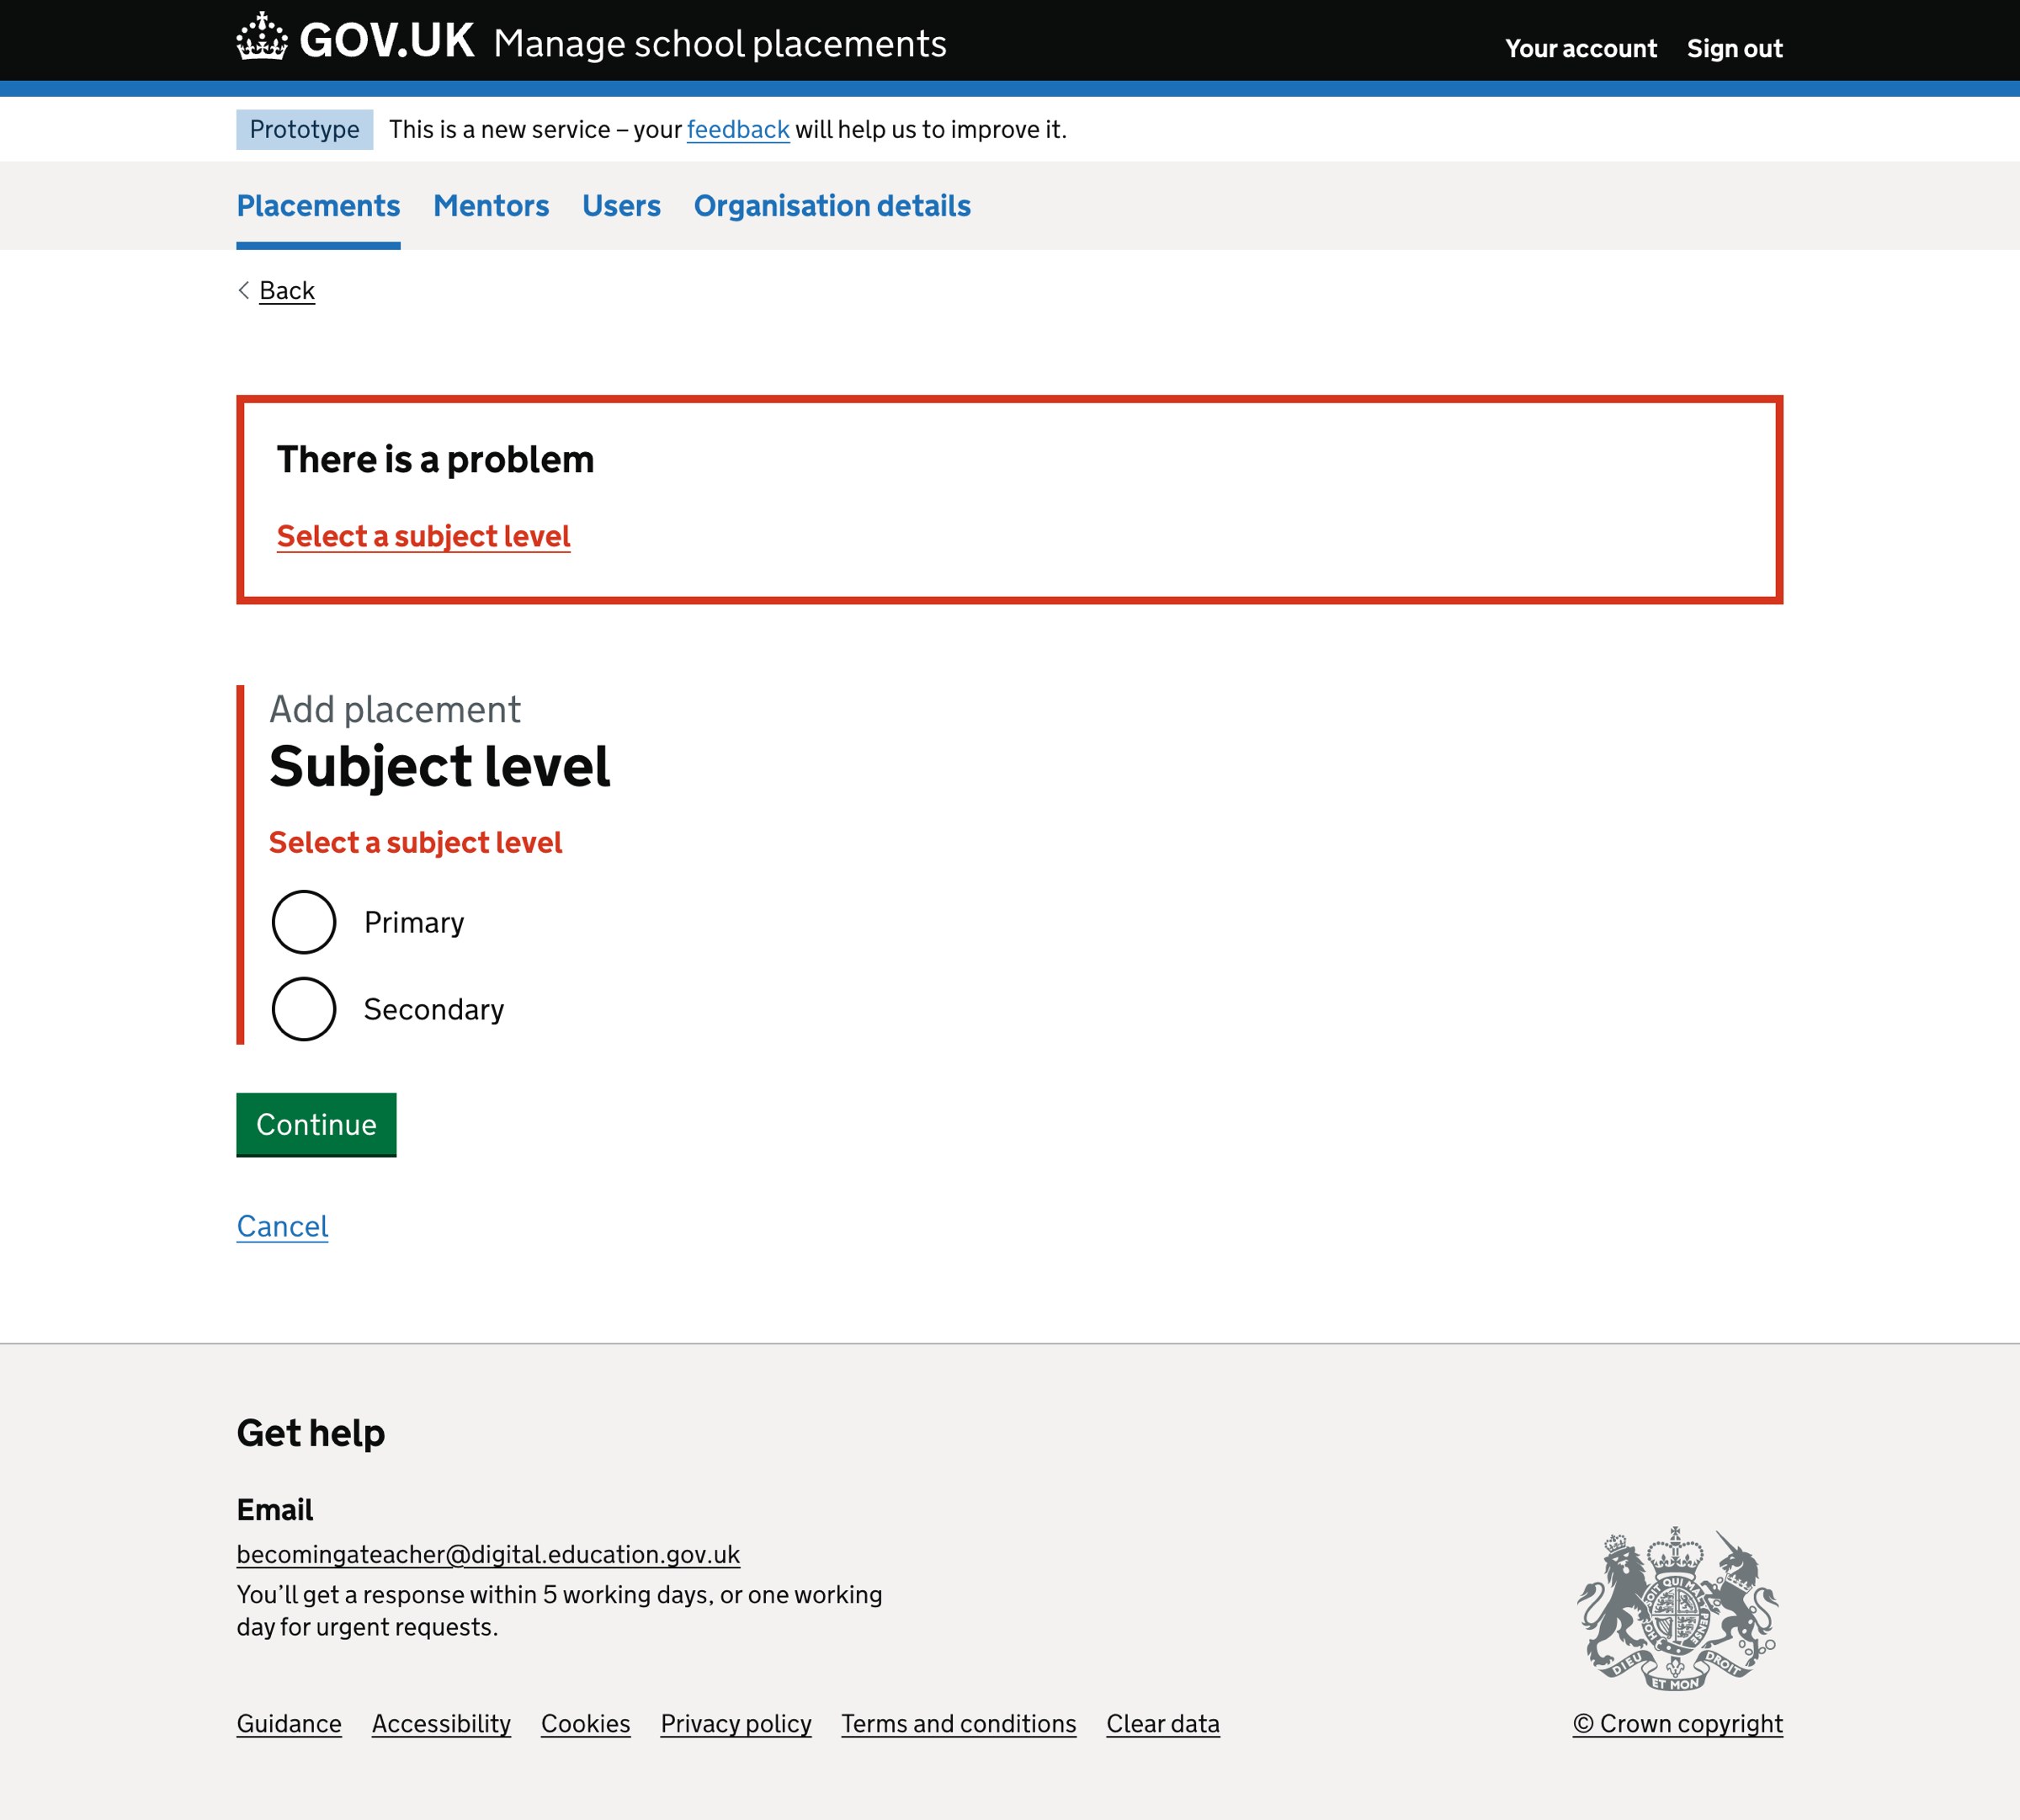
Validation rules
If a user does not select a subject level, we show an error message:
Select a subject level
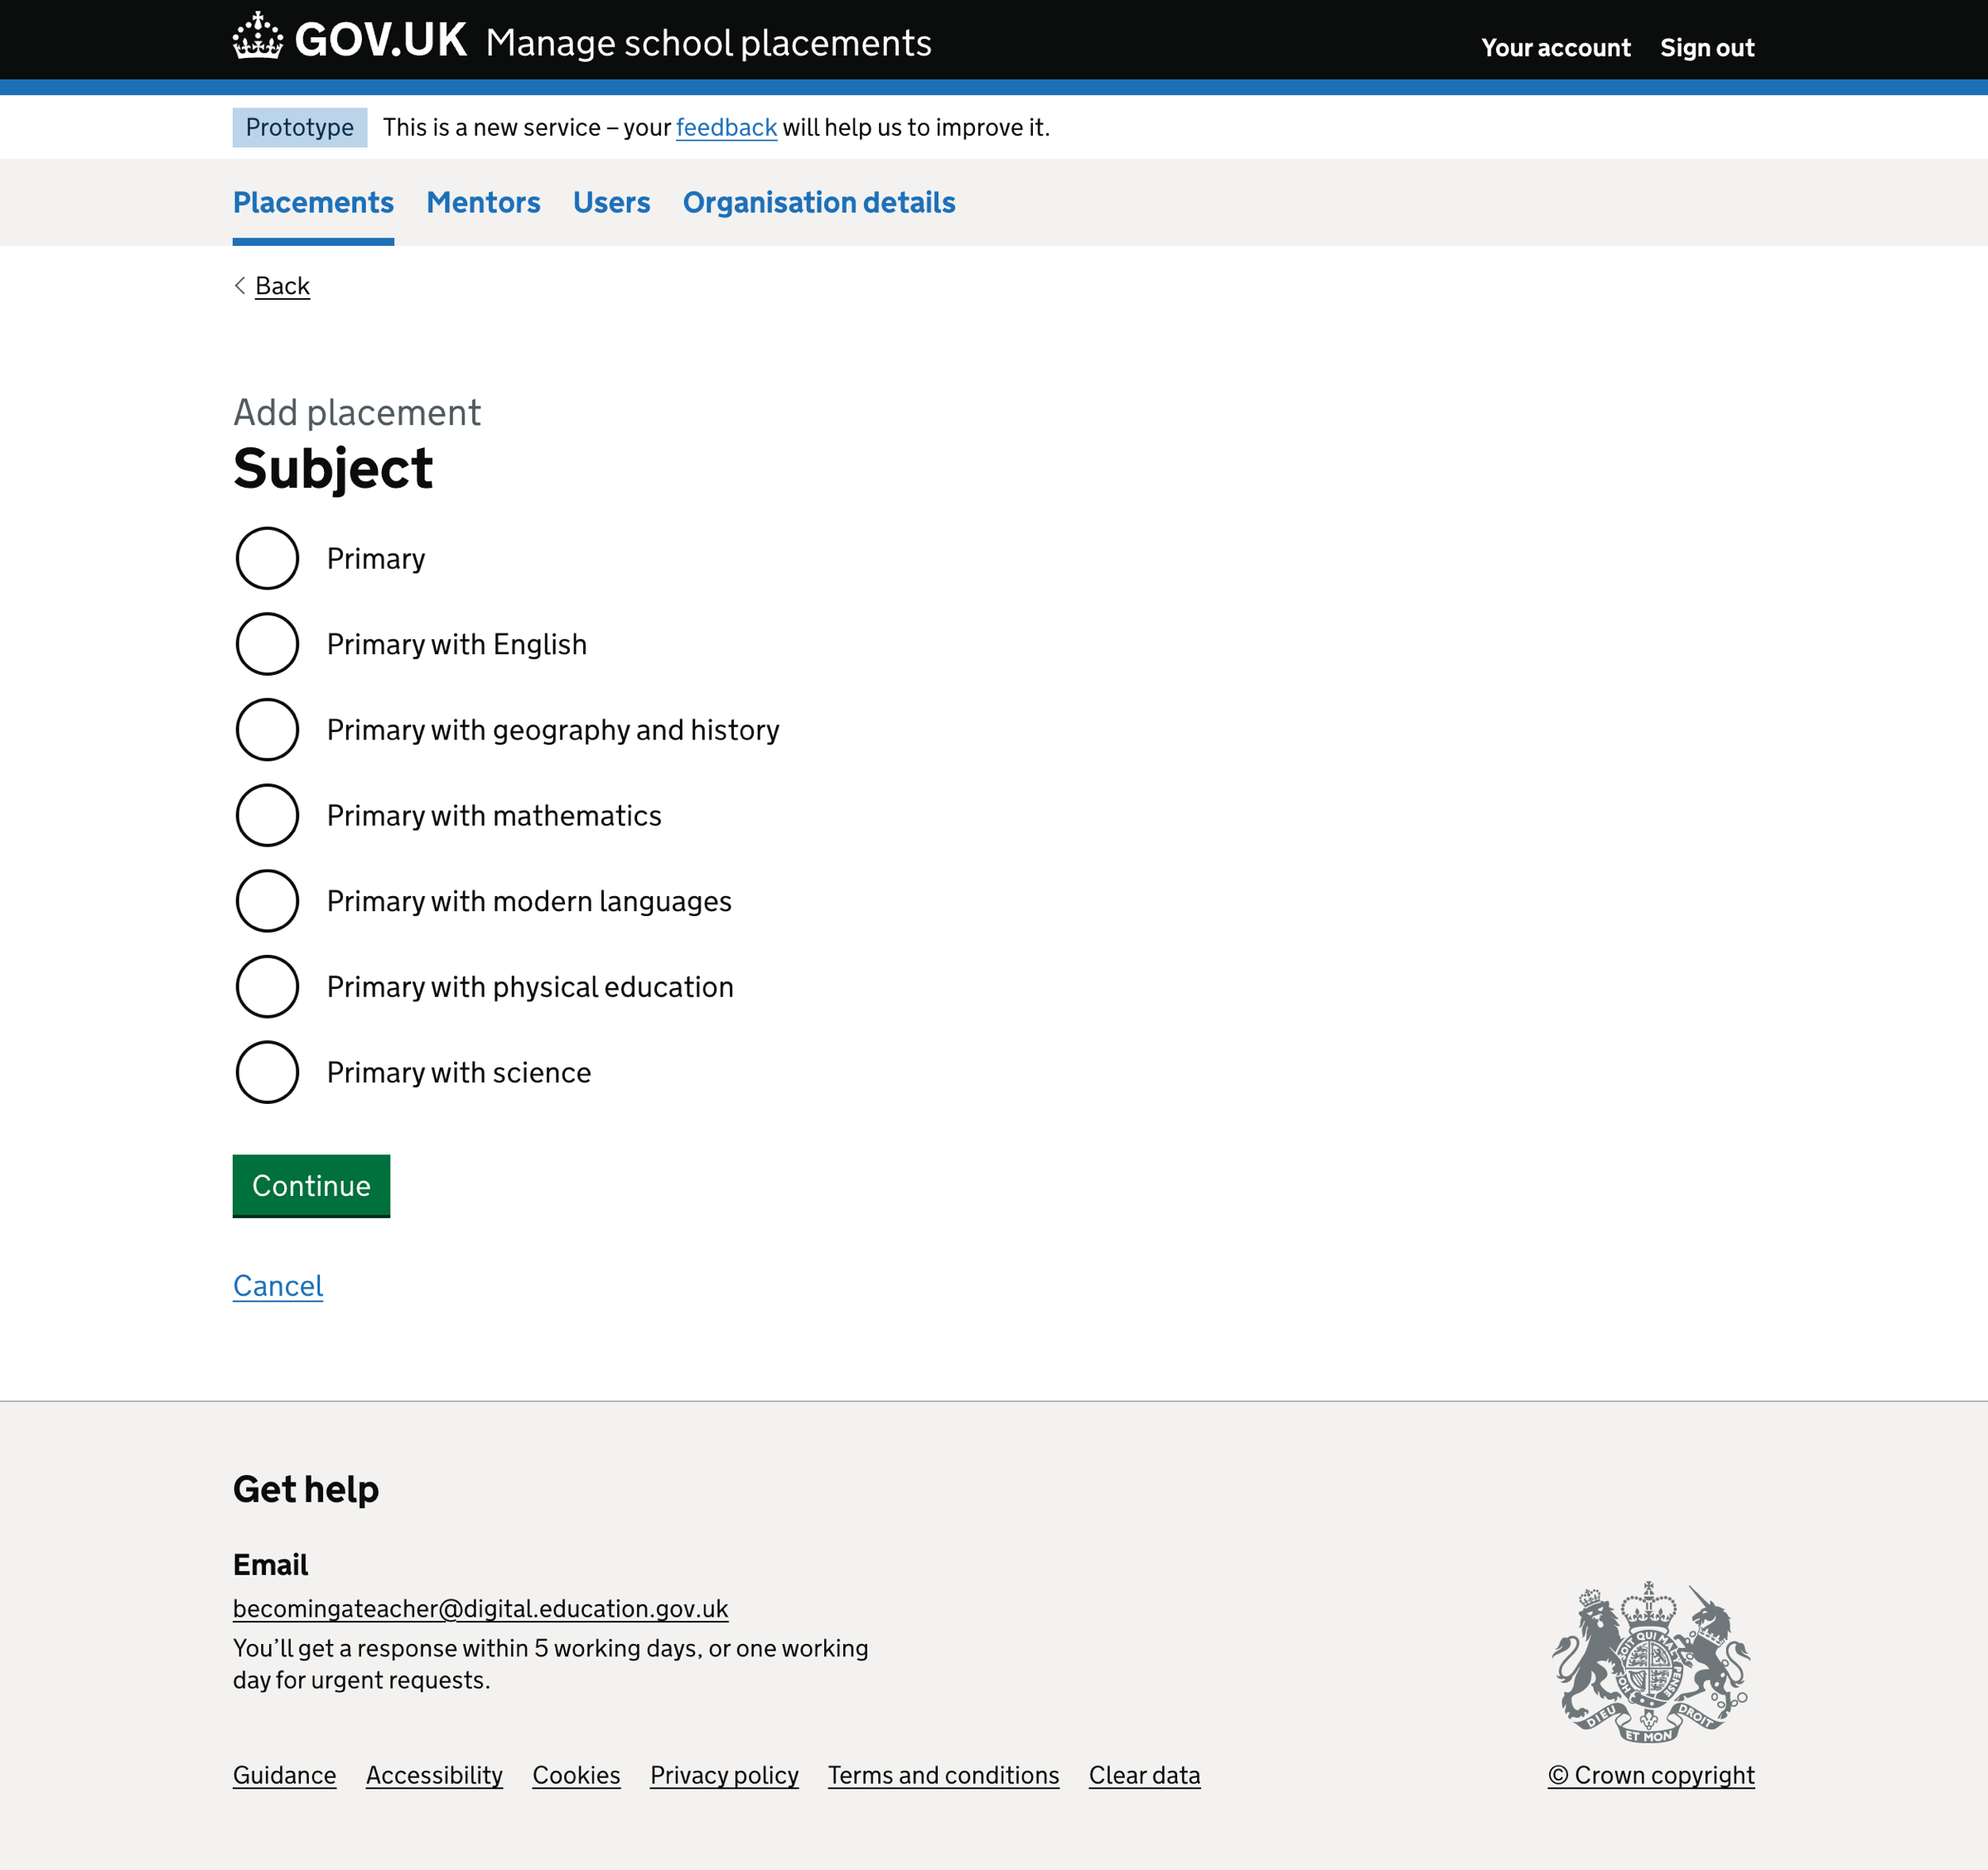
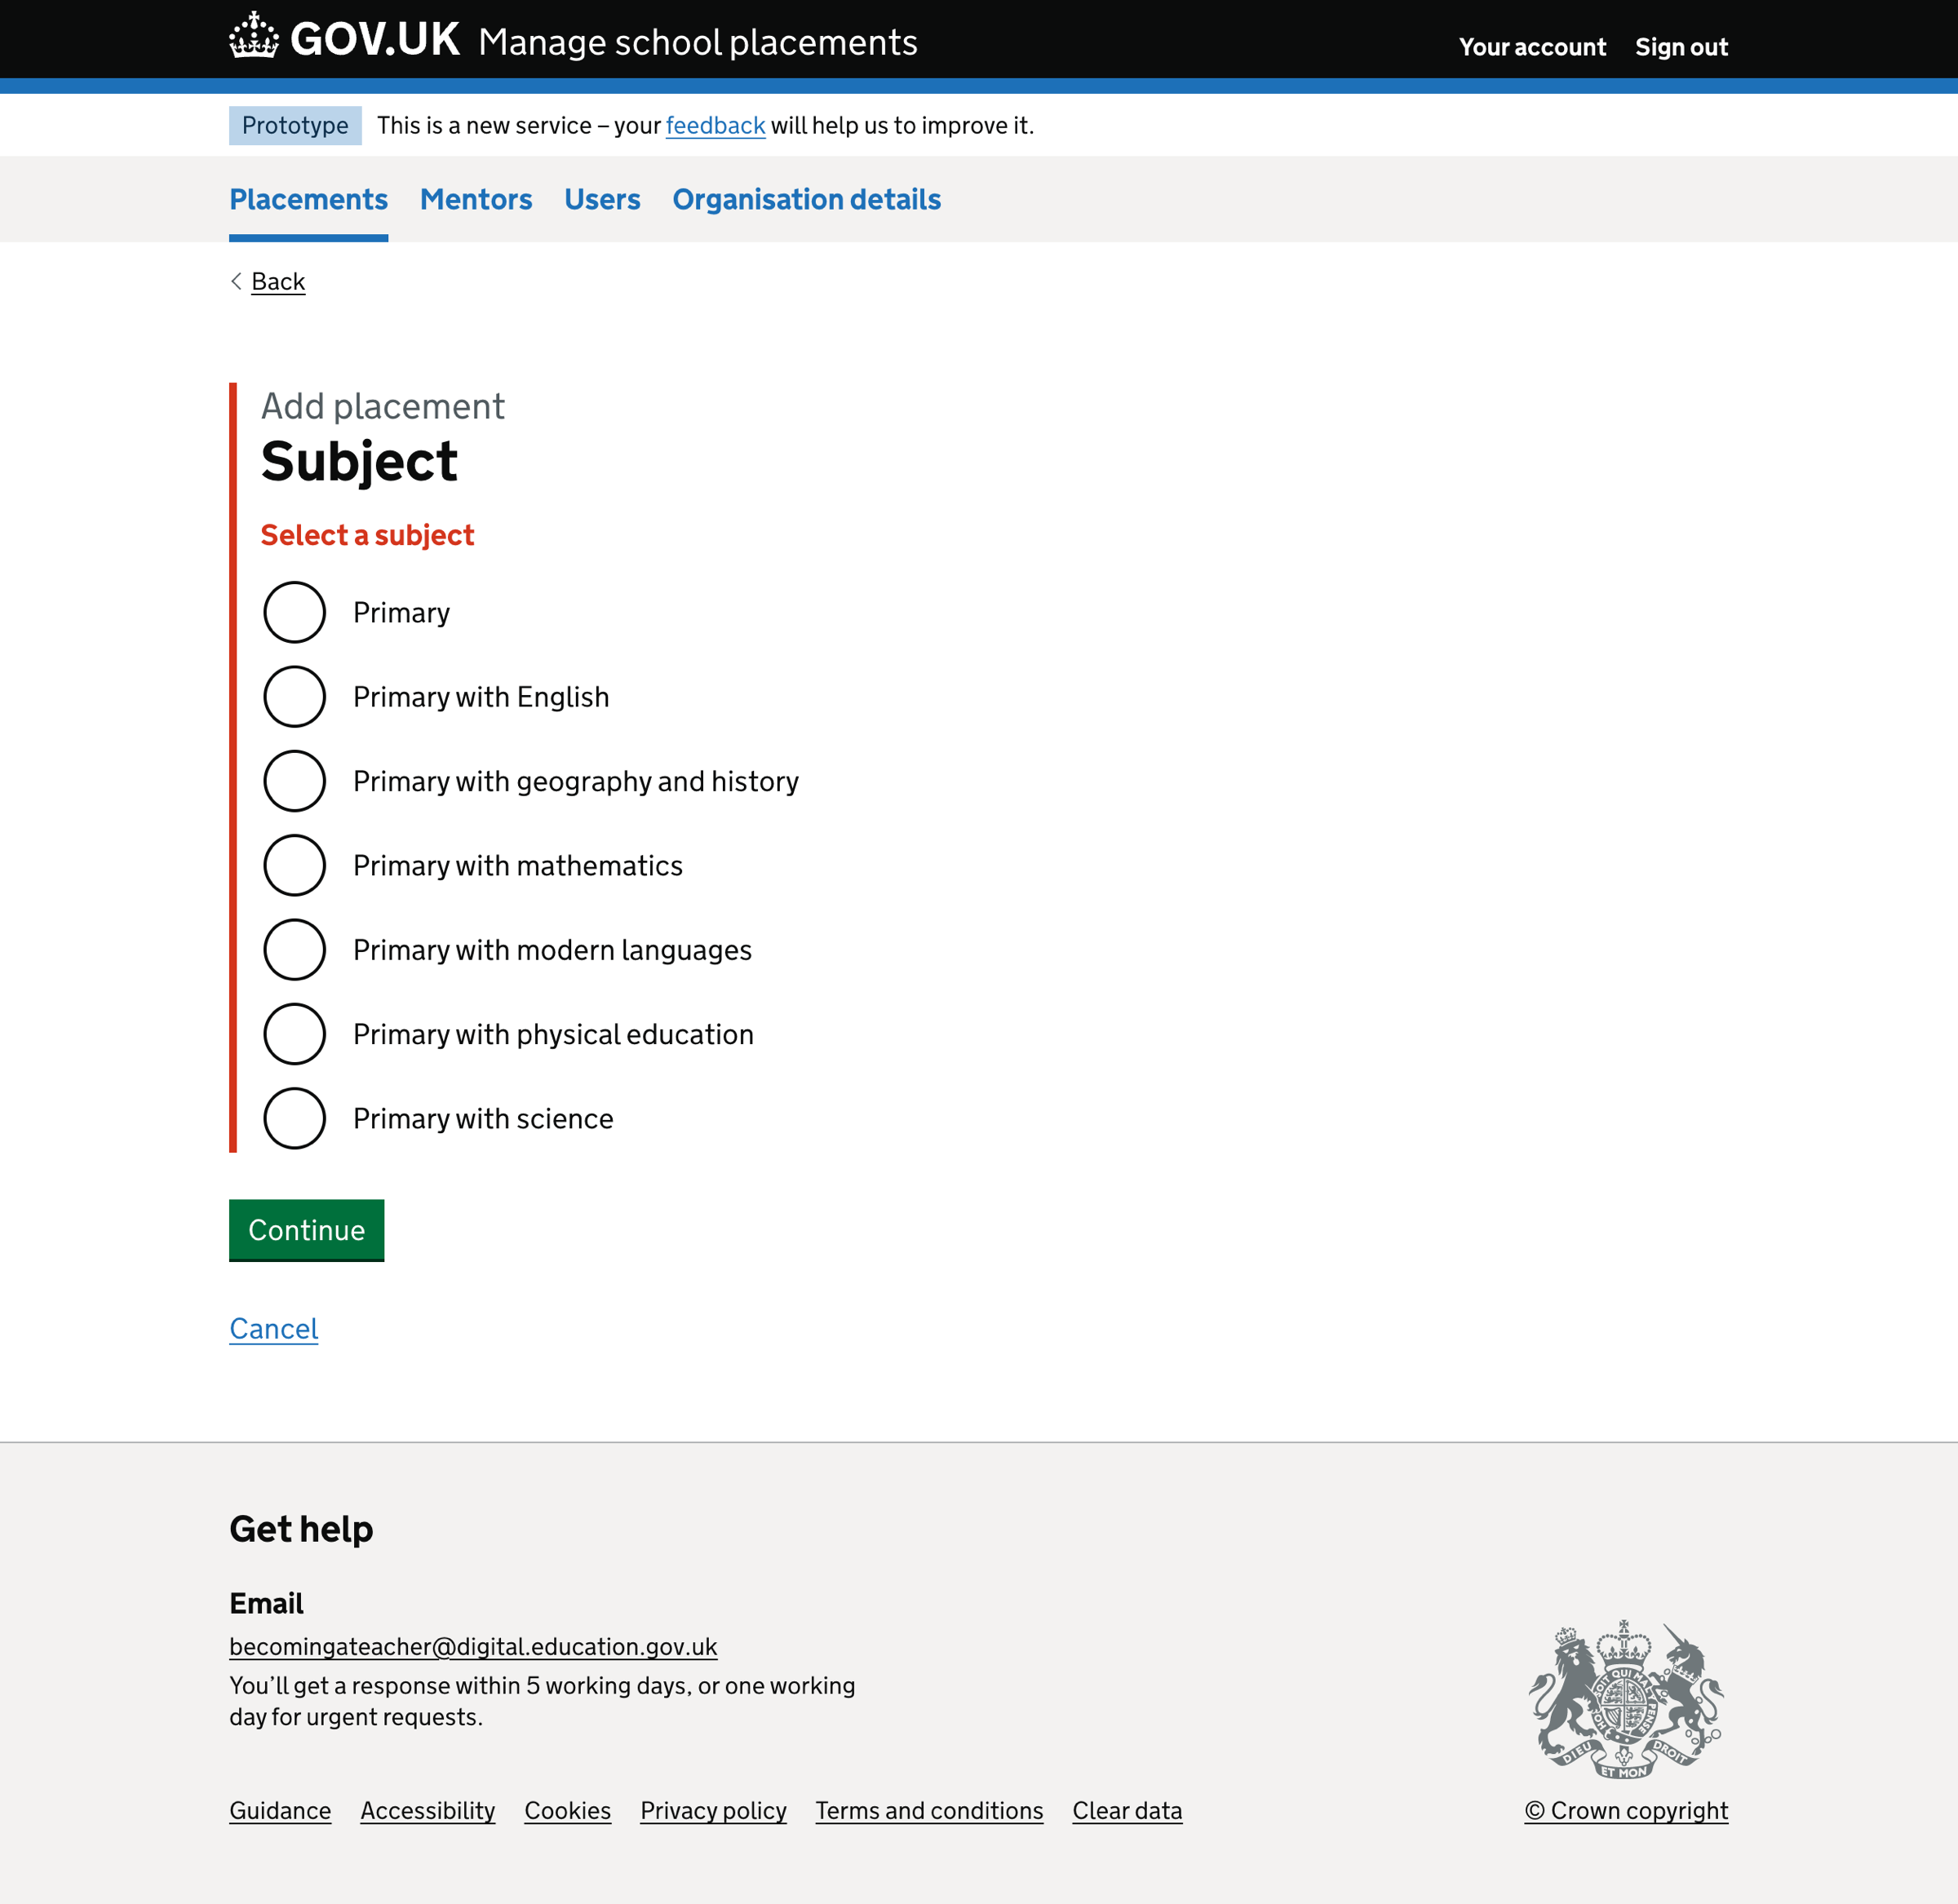
Subject
We use the list of subjects from Publish teacher training courses (Publish).
We show different subject options if the user has previously chosen the ‘Primary’ or ‘Secondary’ subject levels or if we have defaulted the subject level based on the school’s education phase.
If the subject level is ‘Primary’, we show:
- Primary
- Primary with English
- Primary with geography and history
- Primary with mathematics
- Primary with modern languages
- Primary with physical education
- Primary with science
We show the primary subject specialisms as a list of radio buttons. Users can only select one primary subject specialism for a primary placement.
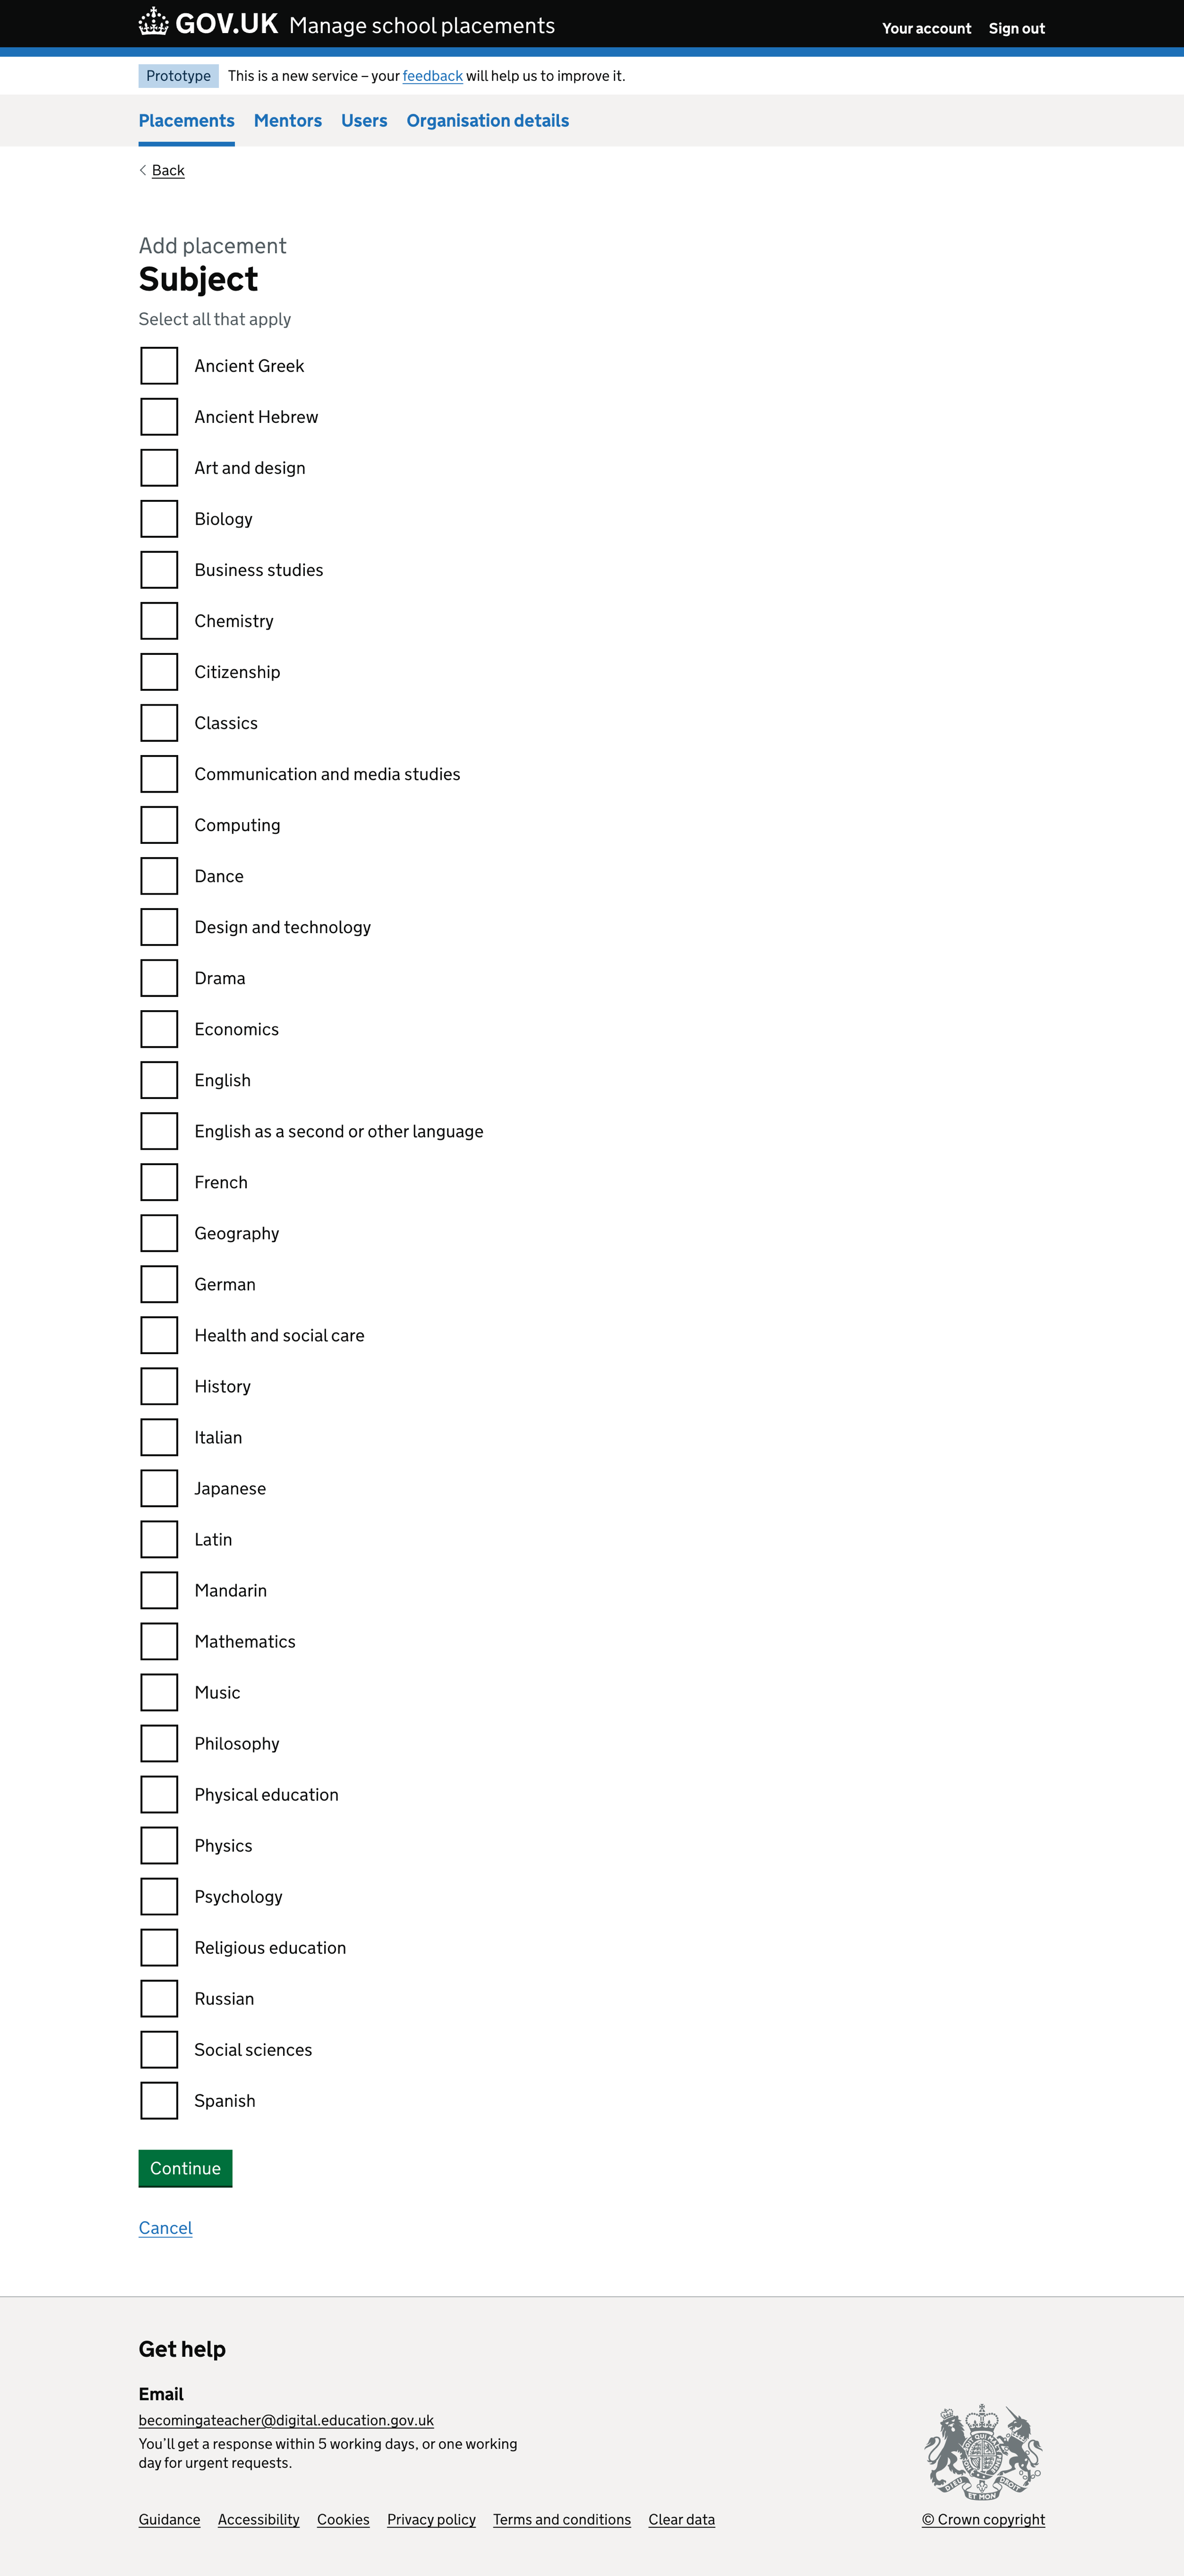
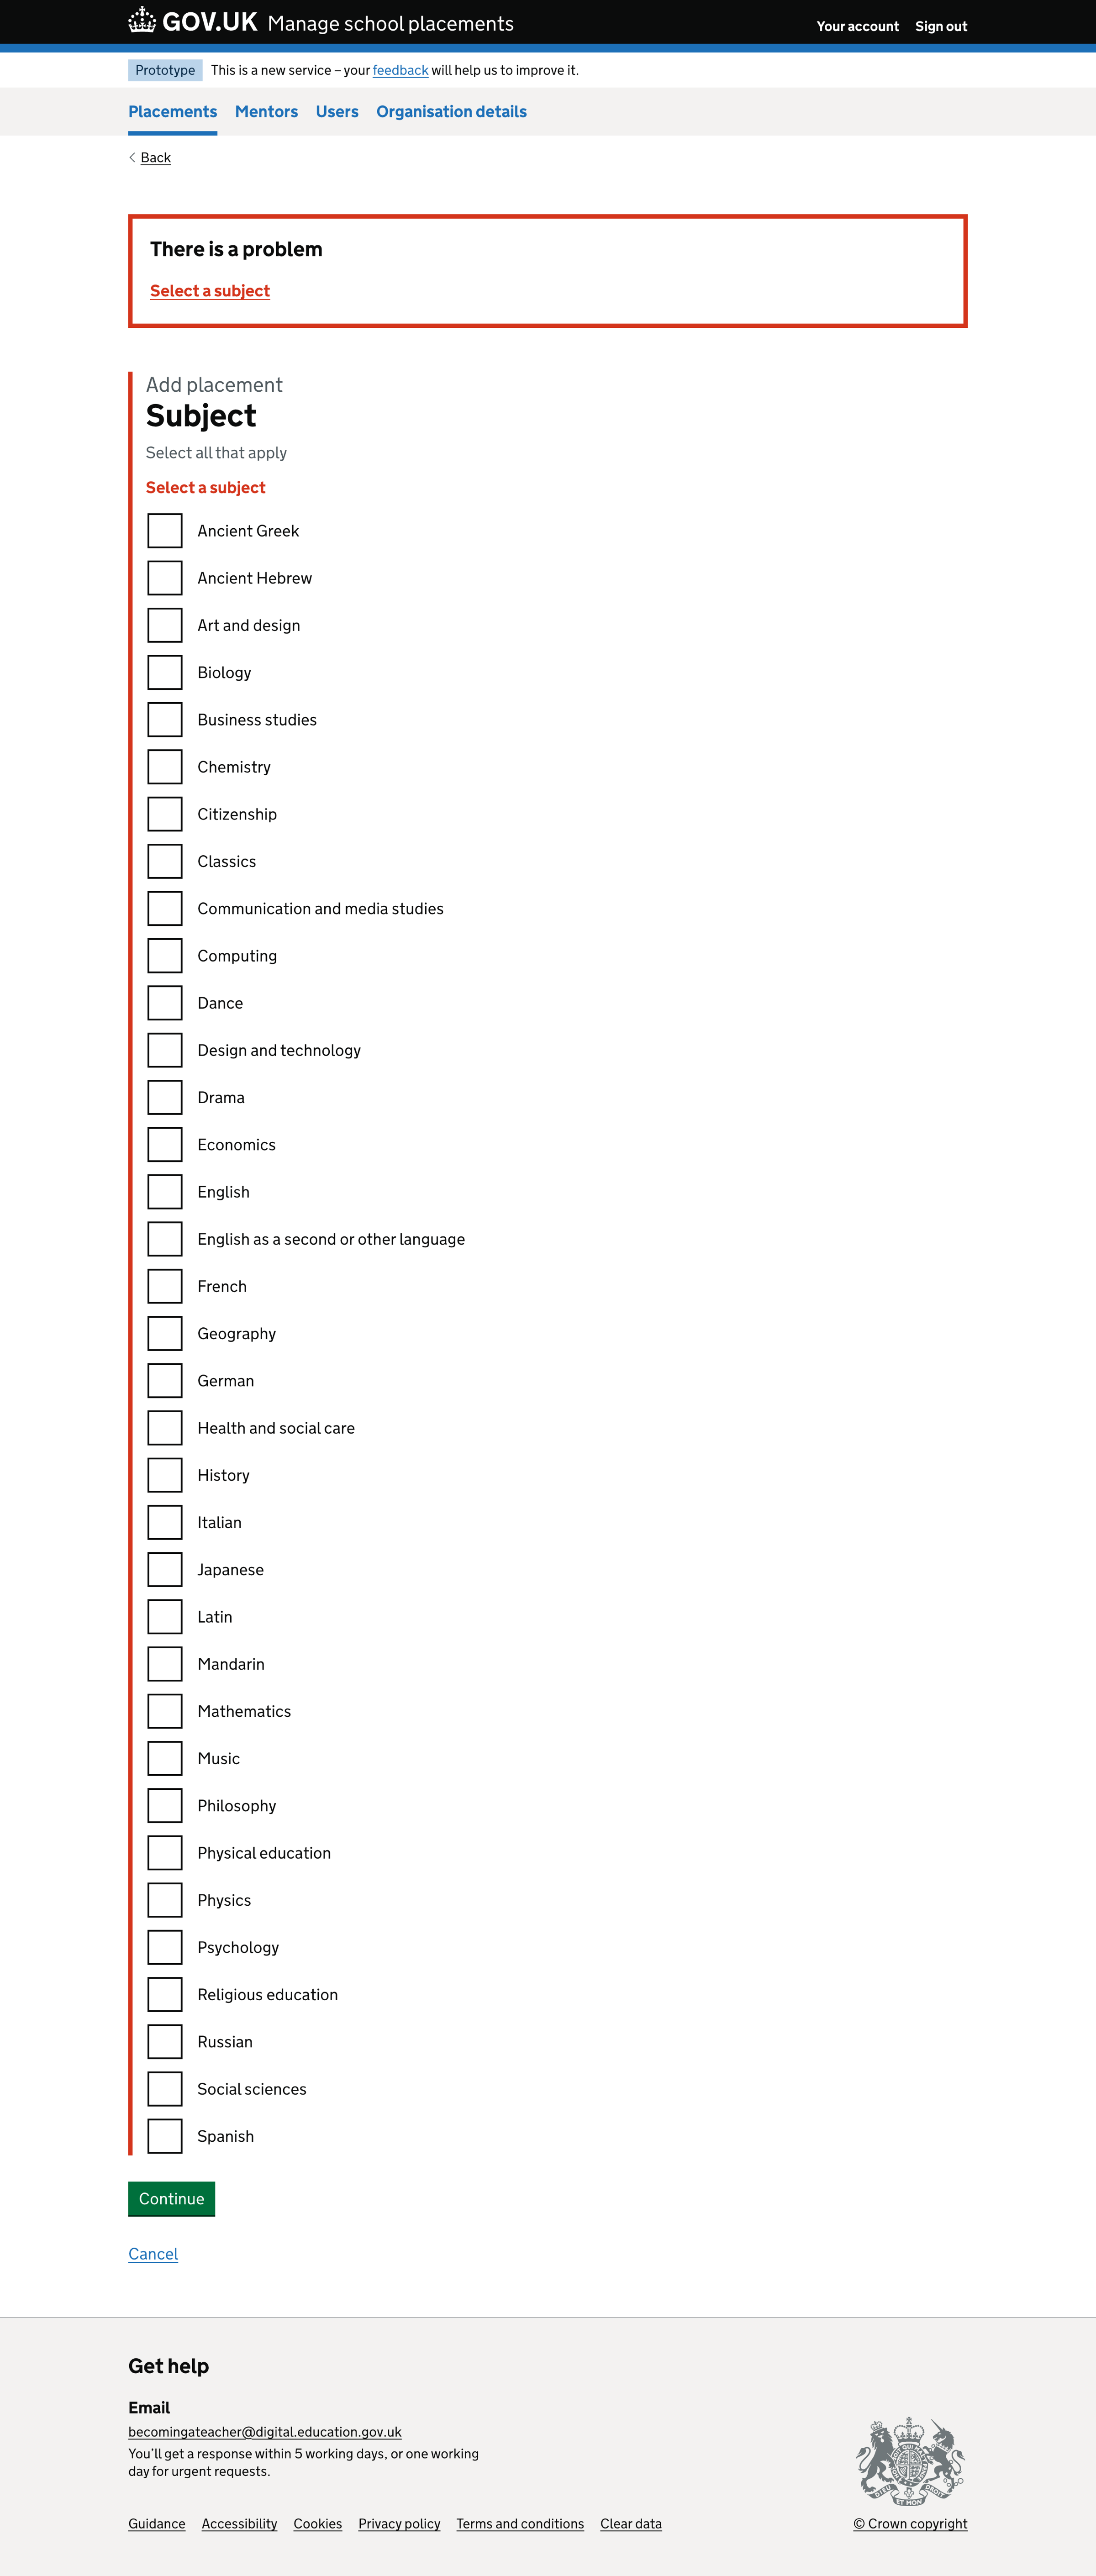
If the subject level is ‘Secondary’, we show:
- Ancient Greek
- Ancient Hebrew
- Art and design
- Biology
- Business studies
- Chemistry
- Citizenship
- Classics
- Communication and media studies
- Computing
- Dance
- Design and technology
- Drama
- Economics
- English
- English as a second or other language
- French
- Geography
- German
- Health and social care
- History
- Italian
- Japanese
- Latin
- Mandarin
- Mathematics
- Music
- Philosophy
- Physical education
- Physics
- Psychology
- Religious education
- Russian
- Science
- Social sciences
- Spanish
We show the secondary subjects as a list of checkboxes. Users can select multiple subjects for a secondary placement.
Validation rules
If a user does not select a subject, we show an error message:
Select a subject
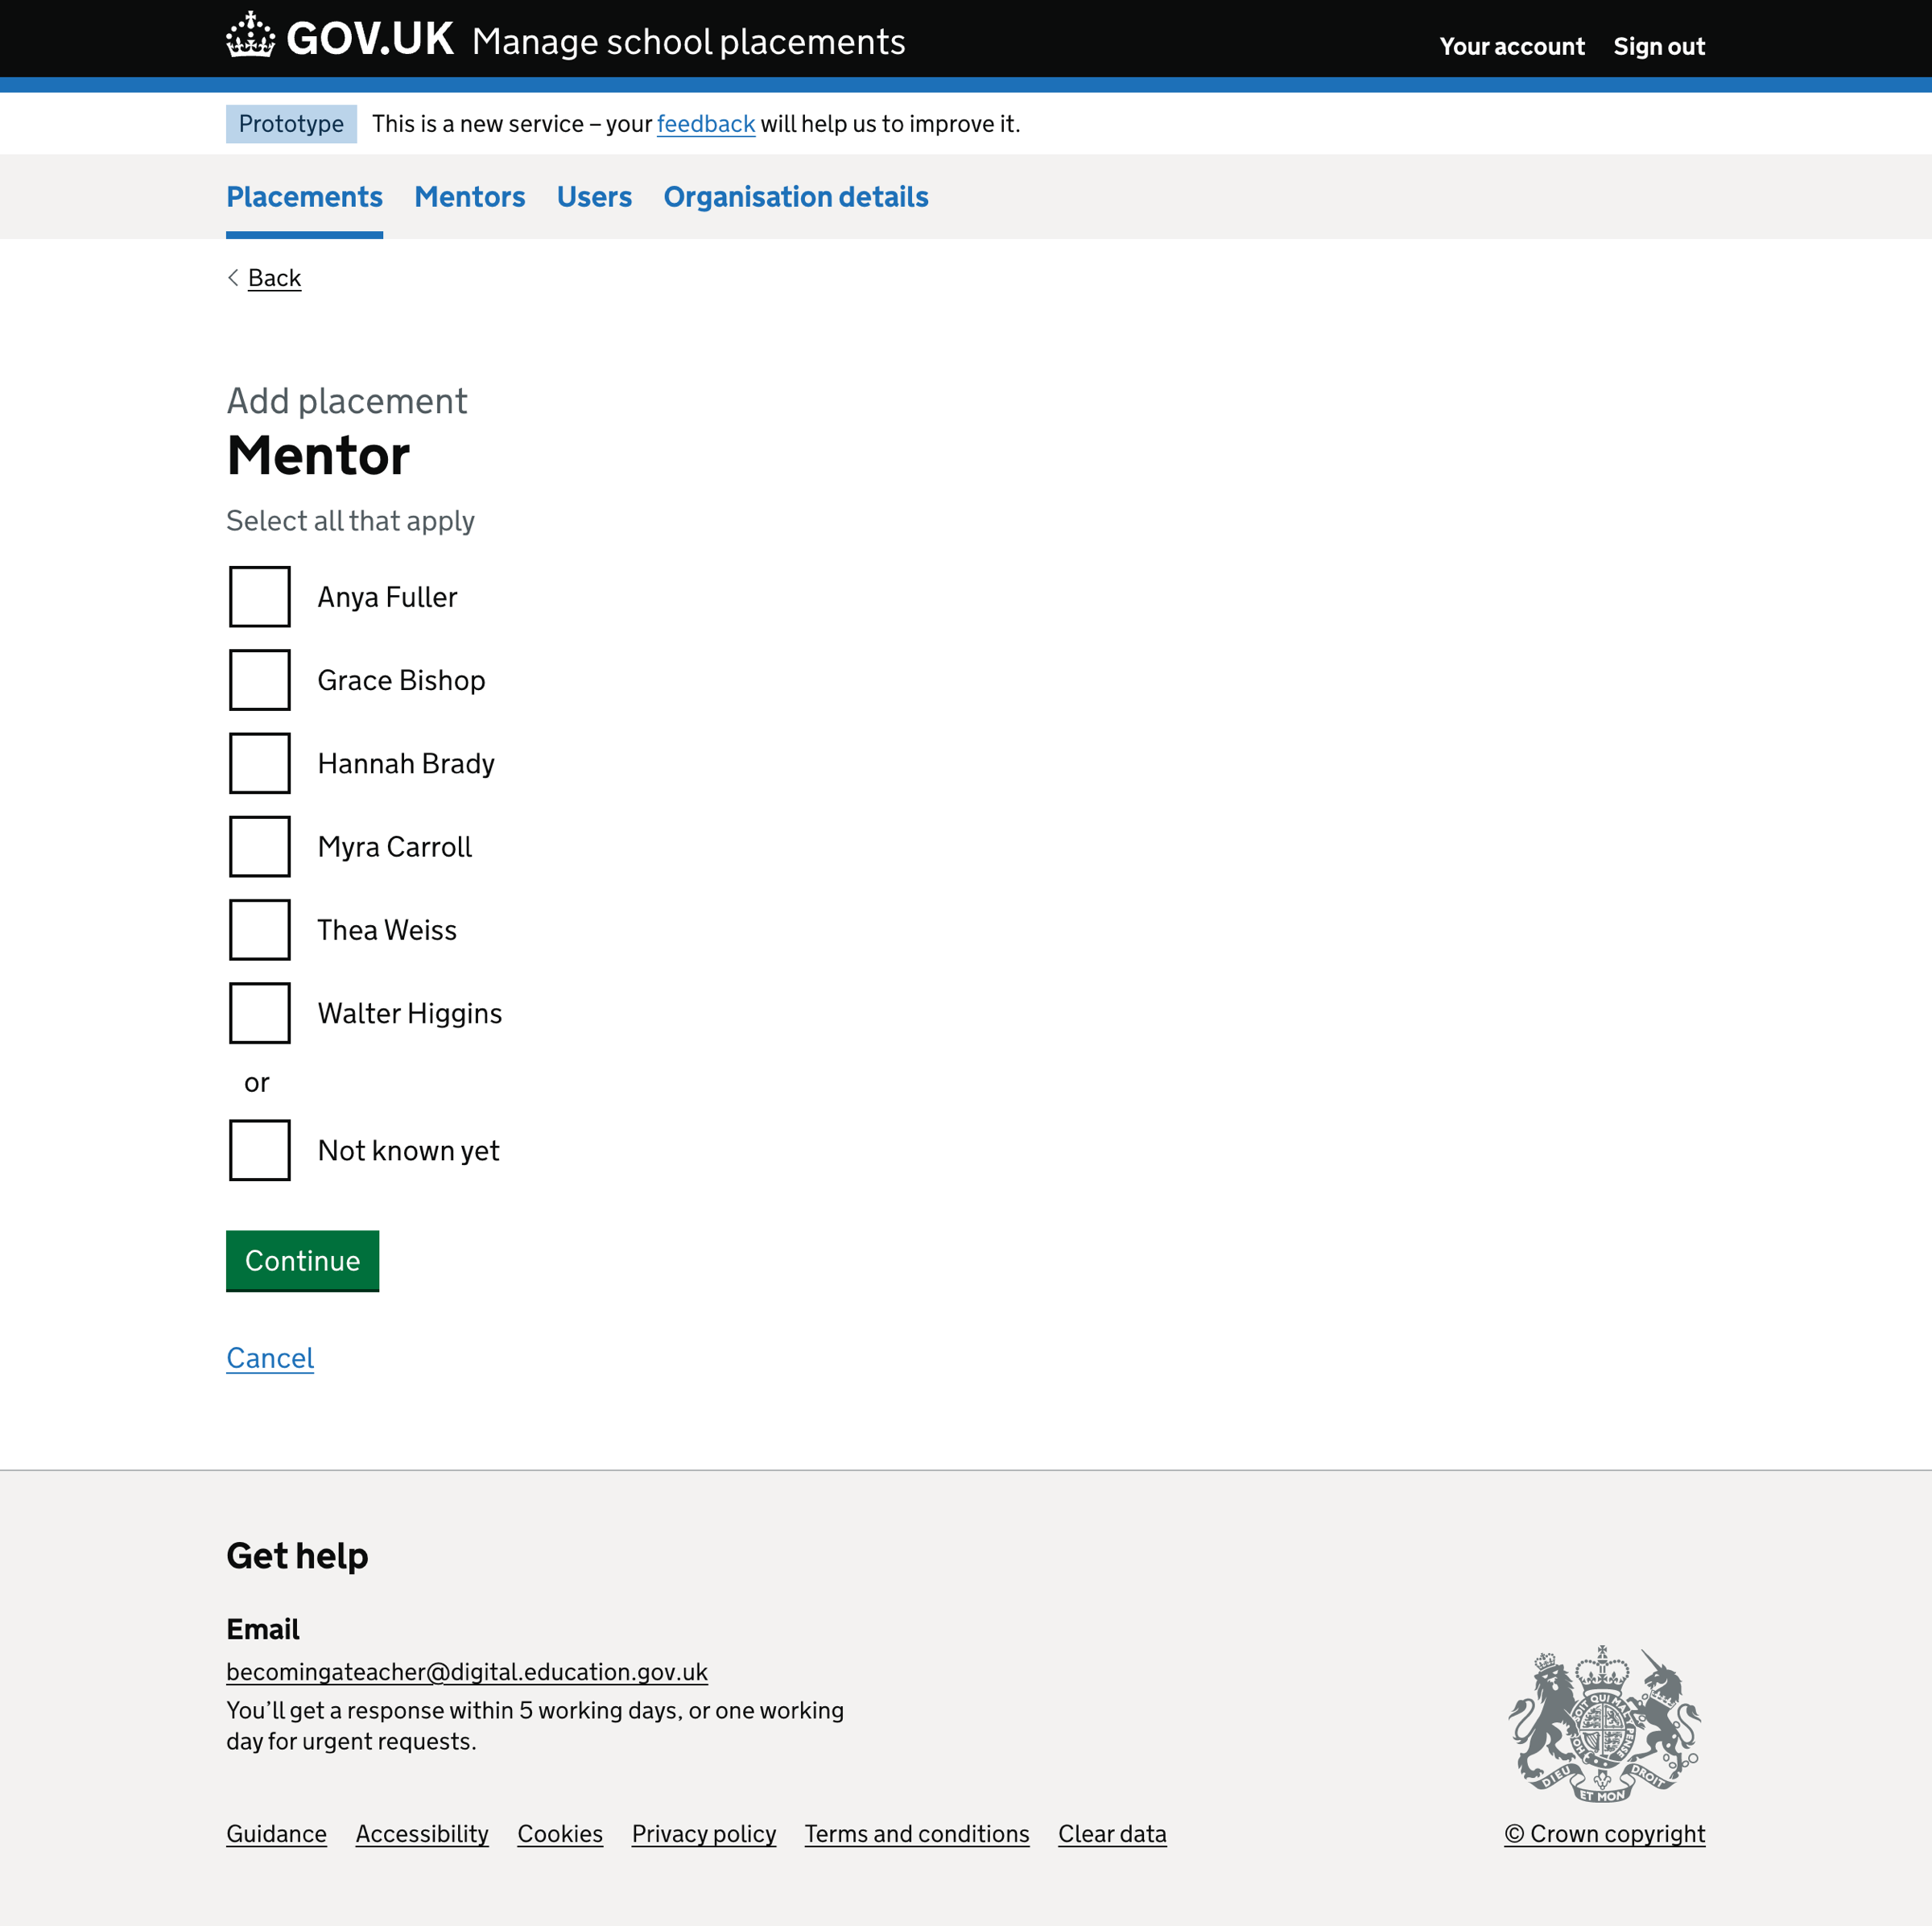
Mentor
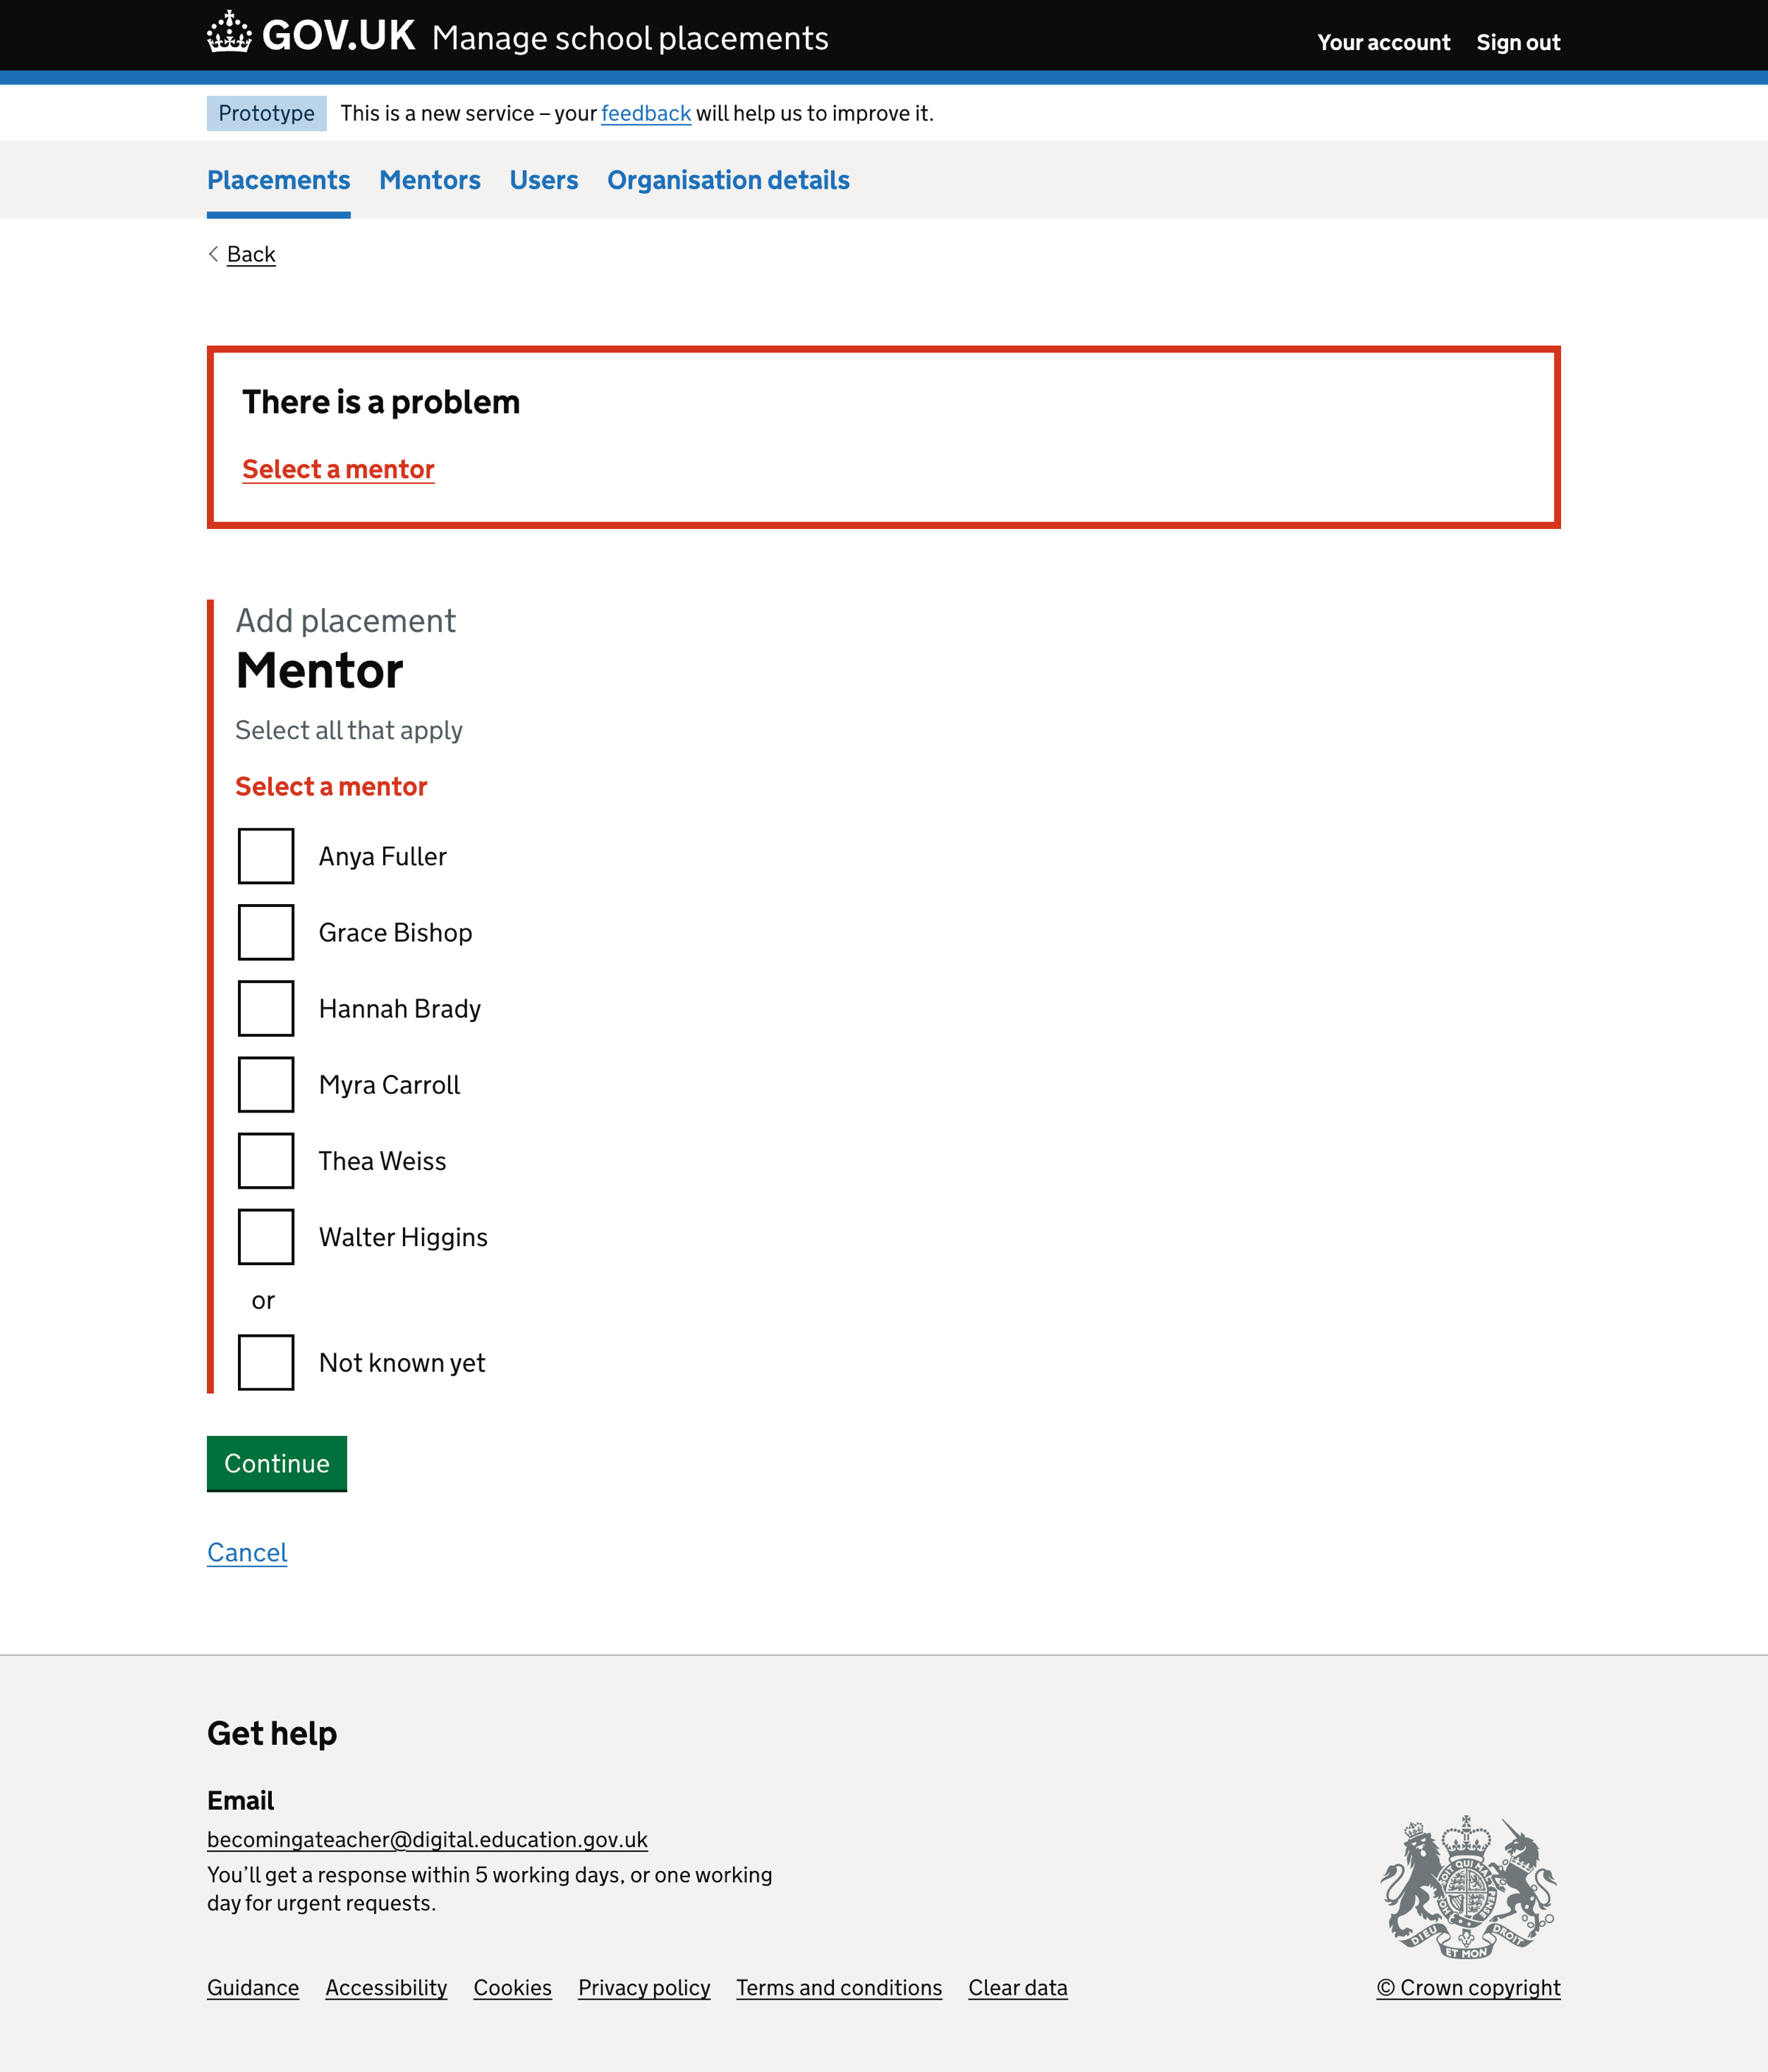
The next step is to add mentors to the placement.
Users can select one or more mentors for a placement or select ‘Not known yet’ if they do not know.
We display mentors in a list of checkboxes. For each mentor on the list, we show their full name.
The ‘Not known yet’ option is exclusive, which means if the user has selected a mentor and then selects this option, the mentor selection is cleared.
Validation rules
If the user does not select an option, we show an error message:
Select a mentor
If JavaScript is unavailable – for example, it has been blocked – and the user selects both a mentor and ‘Not known yet’, we show an error message:
Select a mentor or ‘Not known yet’
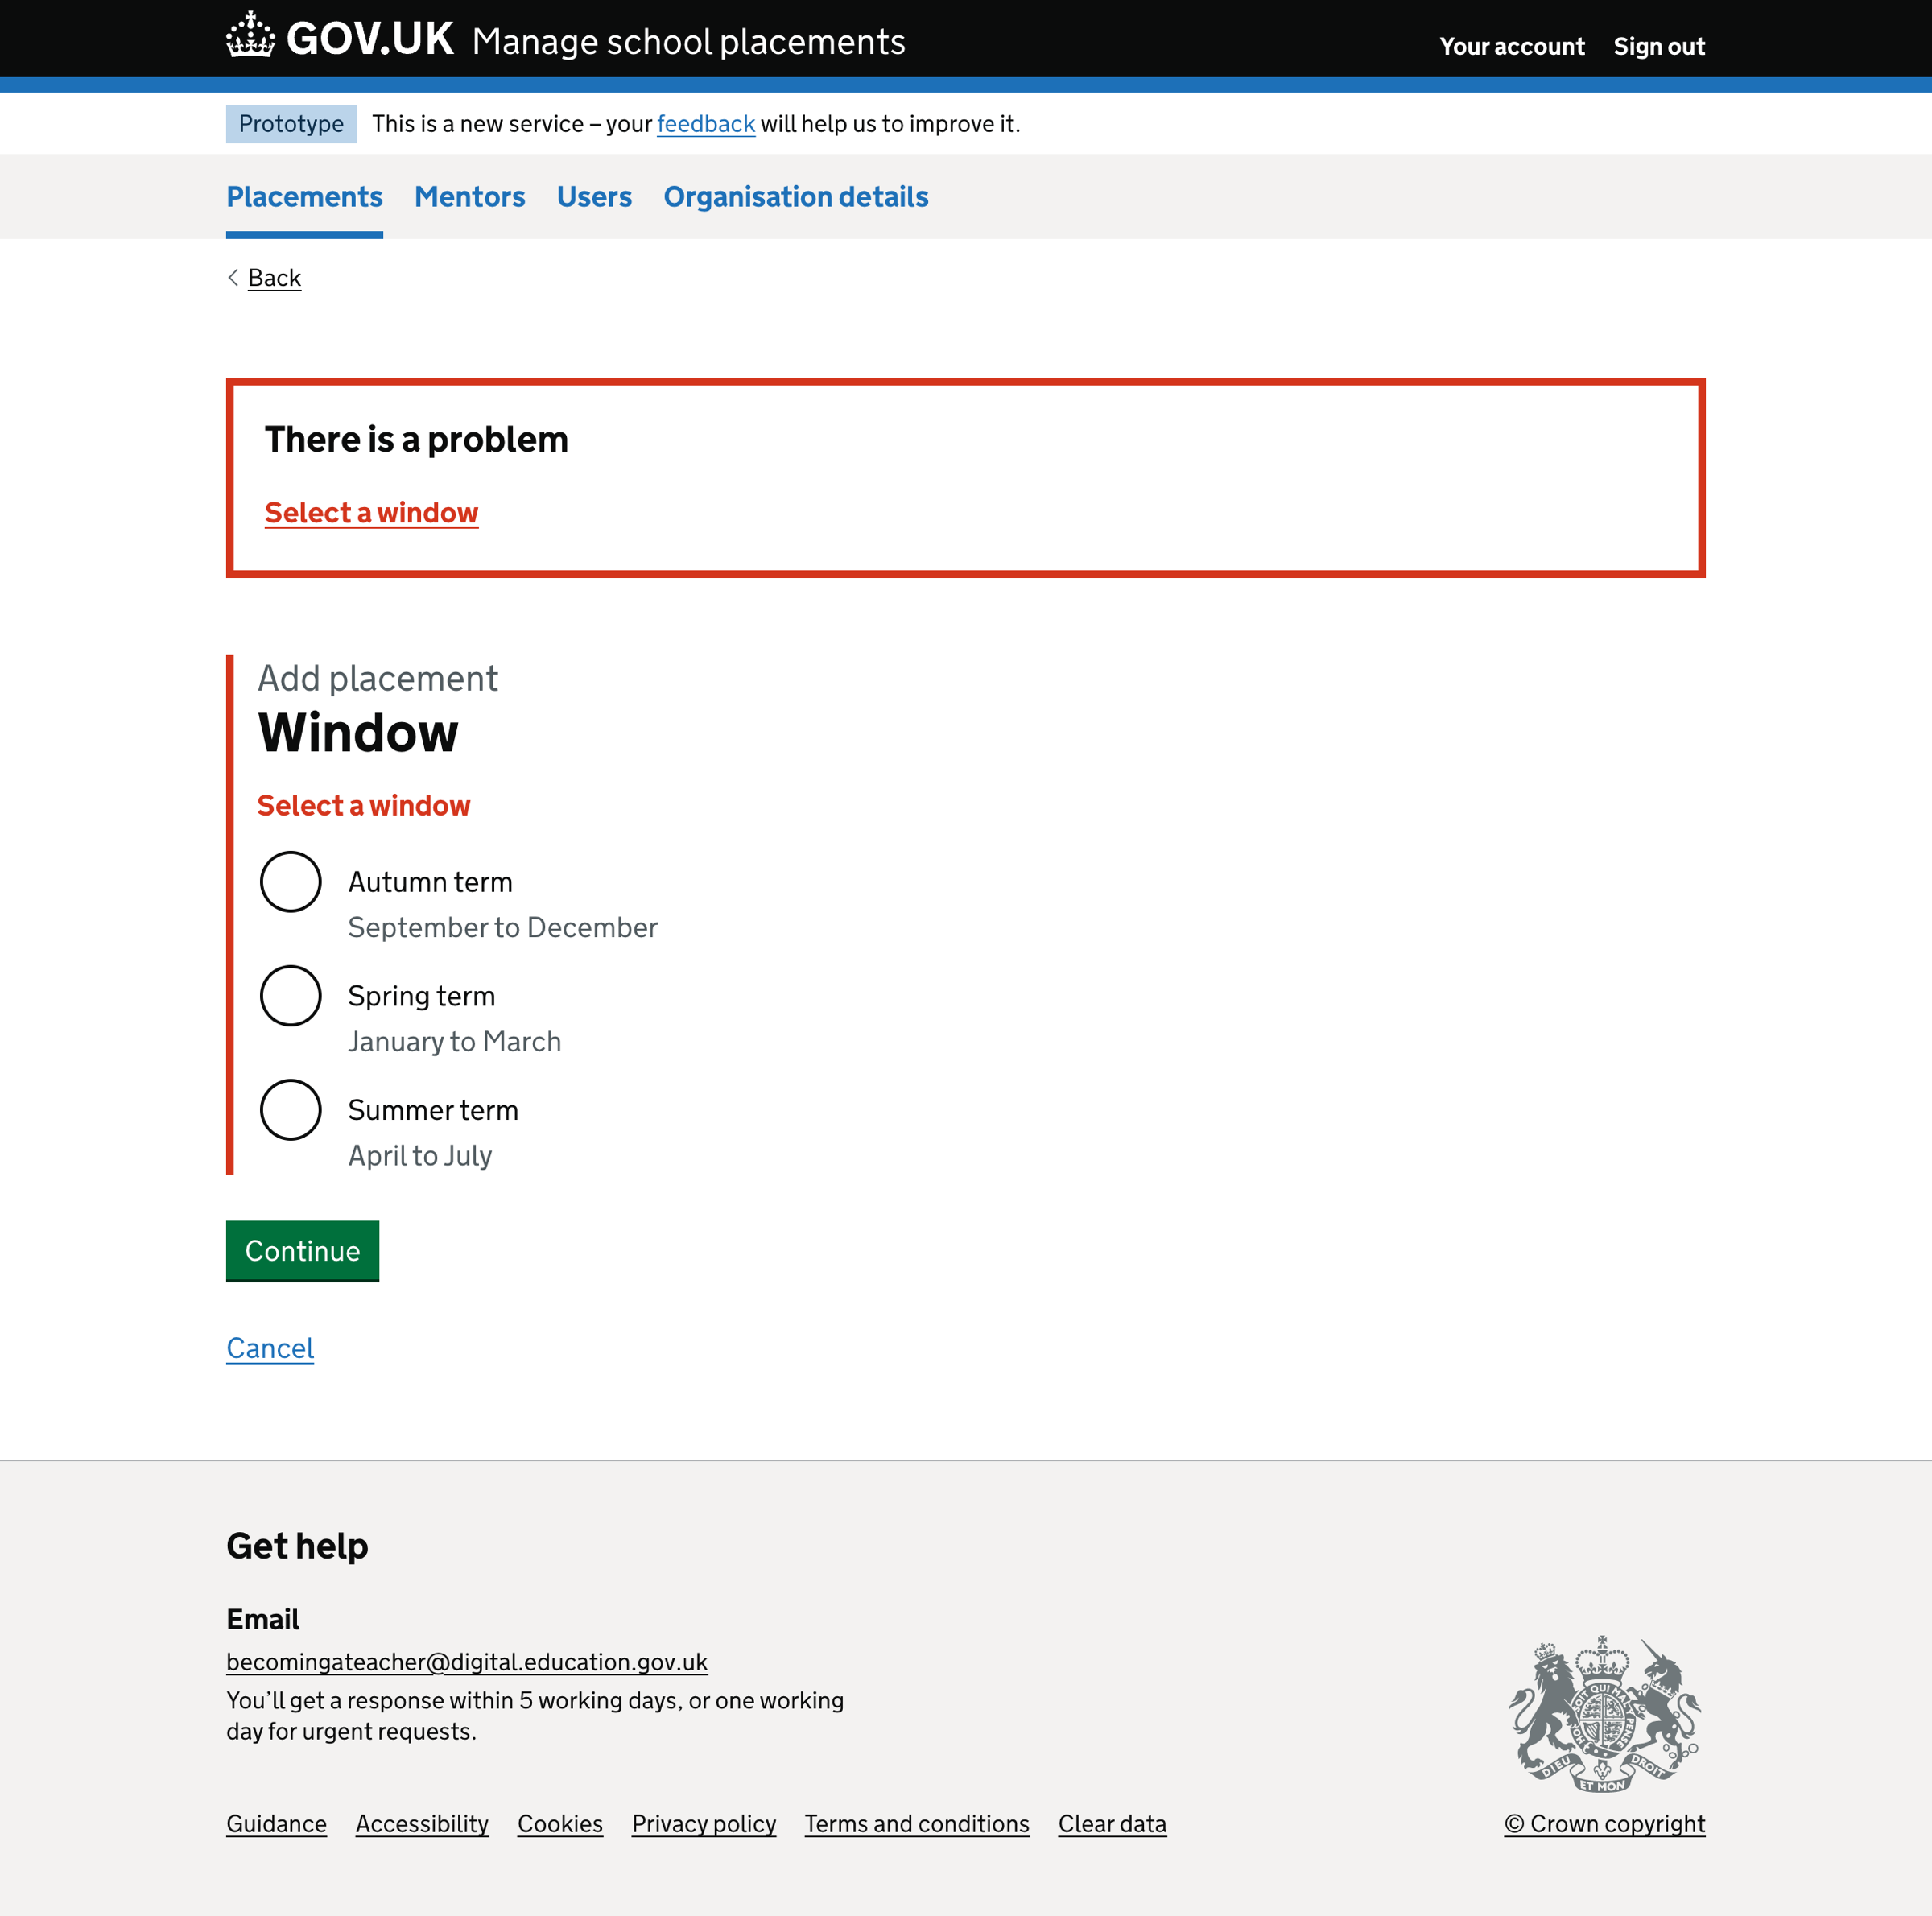
Window
The next step is to select the placement window.
We show 3 radio button options for the placement window, which correspond to terms in the academic year:
- Autumn term
- Spring term
- Summer term
Validation rules
If the user does not select an option, we show an error message:
Select a window
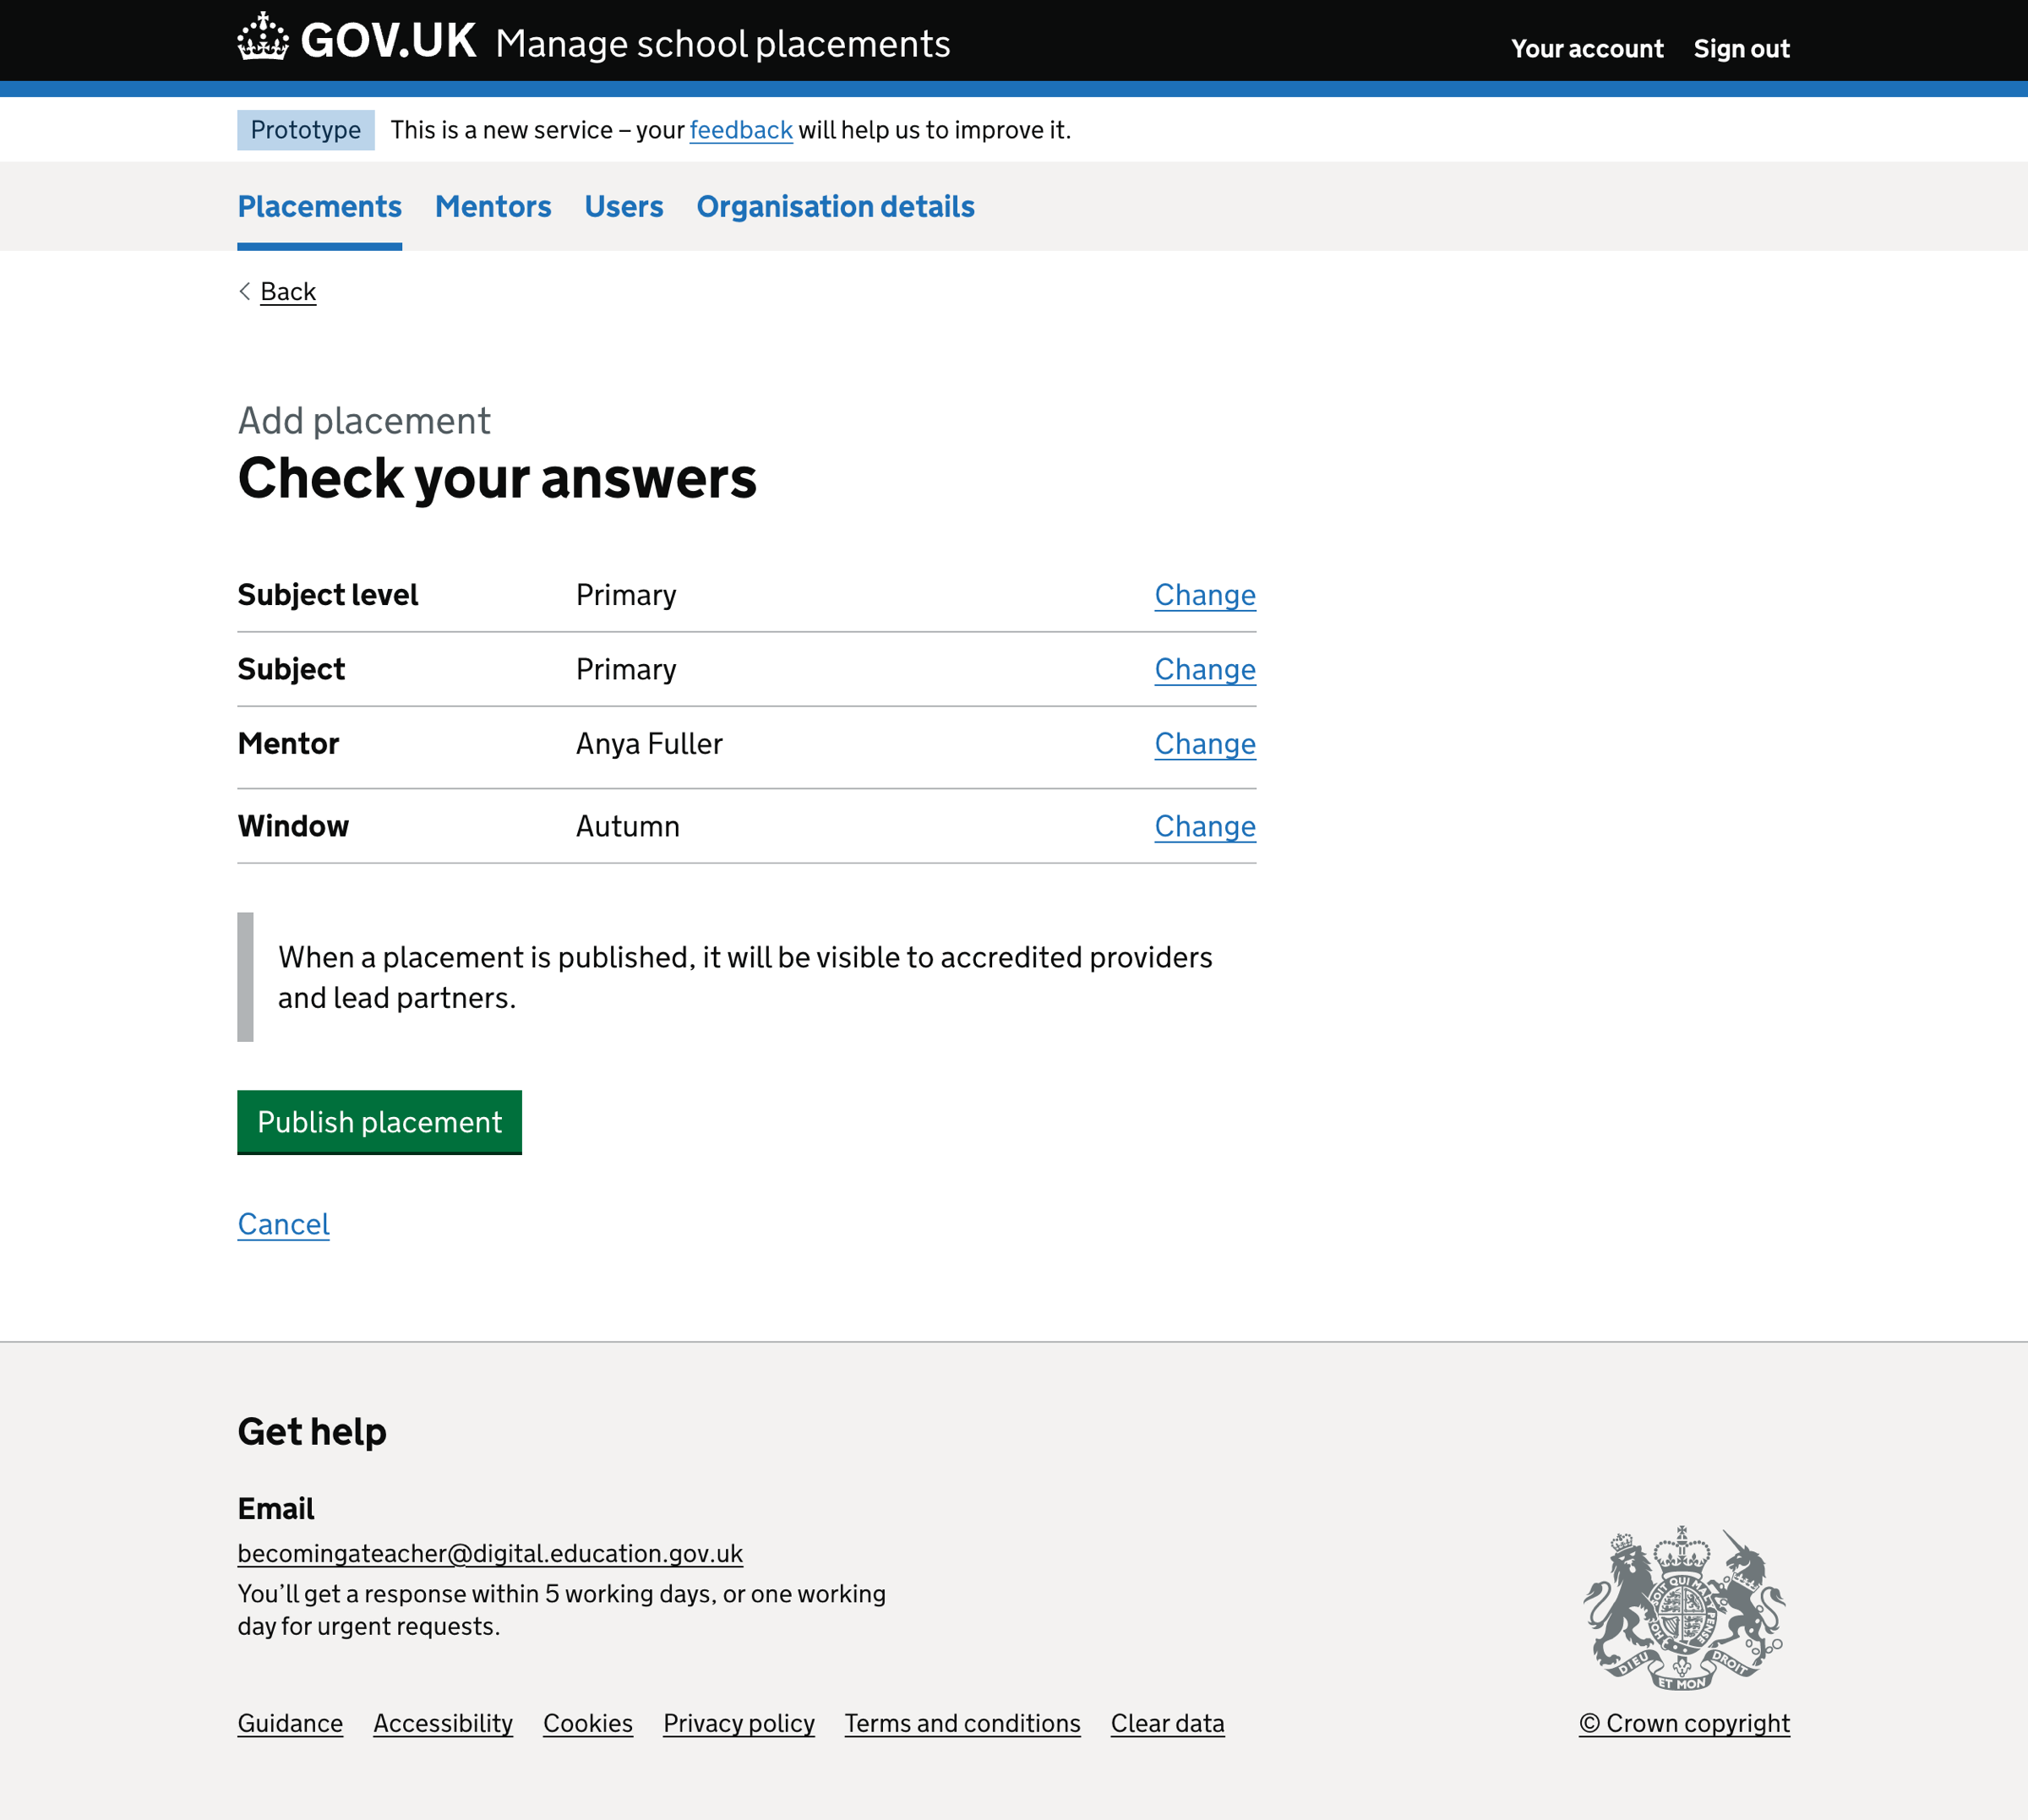
Check your answers
The final step is the ‘Check your answers’ page. The user can change:
- subject level
- subject
- mentor
- window
Users cannot change the subject level if the school’s education phase is primary or secondary.
If users change the subject level, they must also change the subject before returning to the ‘Check your answers’ page.
If a user returns to a previous answer using the change link, the information they entered is pre-populated.
When the ‘Publish placement’ button is selected, the placement is saved and published.
Changing placement details
Users can select the change link on the placement details page to change the placement details.
If users use the change link, they will return to their answer, and the information they previously entered is pre-populated.
When finished, the user sees the ‘Continue’ button, which should return them to the check answers page.
When the ‘Update placement’ button is selected, the placement is updated and published.
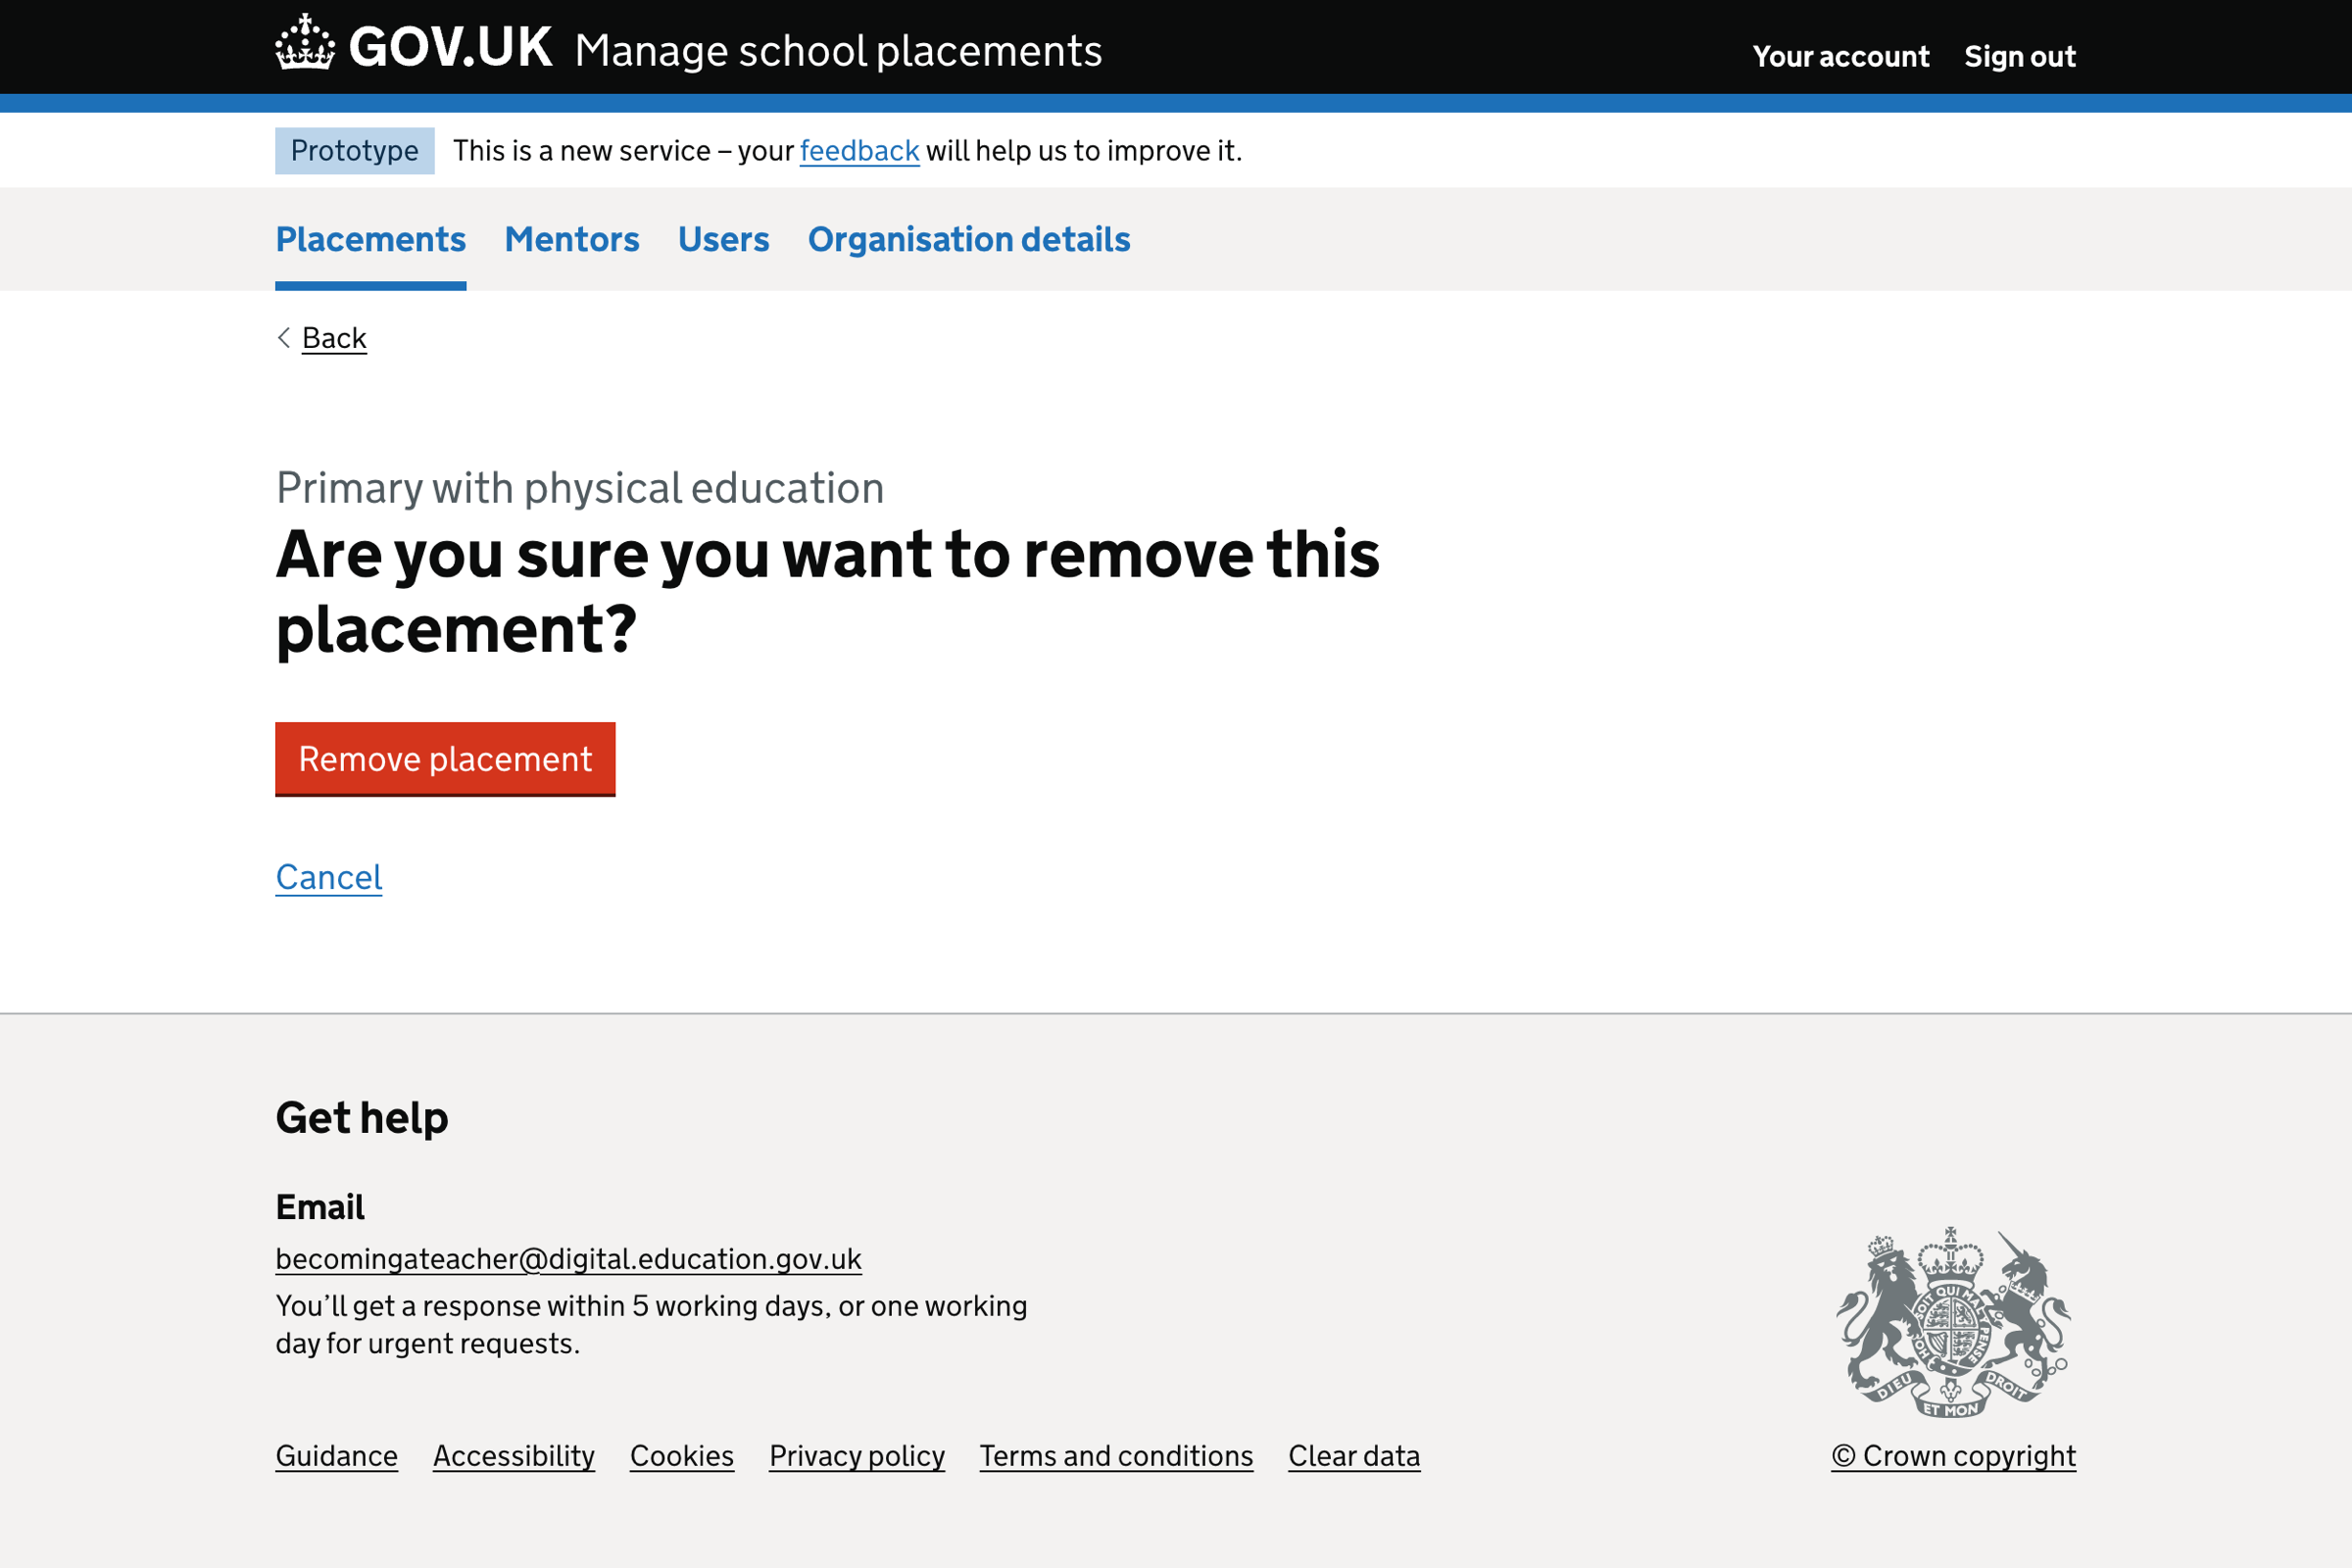
Removing a placement
Users can remove a placement via the placement details page.
Users must confirm the placement’s removal when they select’ Remove placement’.
Further considerations
We considered some changes that we did not implement. These included:
- Filtering the mentor list based on the subject
- Adding a placement before adding mentors to the service
- Create a custom placement window
- Saving a draft
- Only publishing a placement to providers in a school’s network
- Only allowing one mentor per placement
Filtering the mentor list based on the subject
We considered filtering the mentor list in the ‘add placement’ flow depending on the subject selected. Filtering this way requires capturing the subject in the ‘add mentor’ flow. We decided to exclude this feature until user research validated the need.
Adding a placement before adding mentors to the service
Users can select ‘not known yet’ when assigning a mentor to a placement. However, the service requires users to add at least one mentor before creating a placement.
We considered allowing users to add a placement before adding any mentors; however, we wanted to encourage the behaviour of adding mentors.
Creating a custom placement window
We considered adding a custom ‘start date and end date’ for the placement window because some providers have placements that span terms. However, this question captures school availability to host placements, so we decided the broad term windows were sufficient.
Saving a draft
We considered allowing users to save a draft placement. However, there wasn’t a clear need from research to suggest users would need this option.
Only publishing a placement to providers in a school’s network
Schools and providers have relationships with each other to provide trainees for placements. We considered the need for a user to publish to providers within and outside their network. Being able to publish outside the network would bring a market benefit. However, we need to validate the user needs.
One mentor per placement
We initially considered a workflow where the user would have one mentor per placement. However, we’ve allowed users to add more mentors per placement because this is a real-world experience.
Screenshots#
- Placements list
- Placements list - empty
- Placements list - no mentors
- Add placement - select subject level
- Add placement - select subject level error
- Add placement - select primary subject
- Add placement - select primary subject error
- Add placement - select secondary subject
- Add placement - select select subject error
- Add placement - select mentor
- Add placement - select mentor error
- Add placement - select a mentor or ‘Not known yet’ error
- Add placement - select window
- Add placement - select window error
- Add placement - check your answers
- Add placement - success
- Placement details
- Remove placement
- Placement removed success message
Placements list#
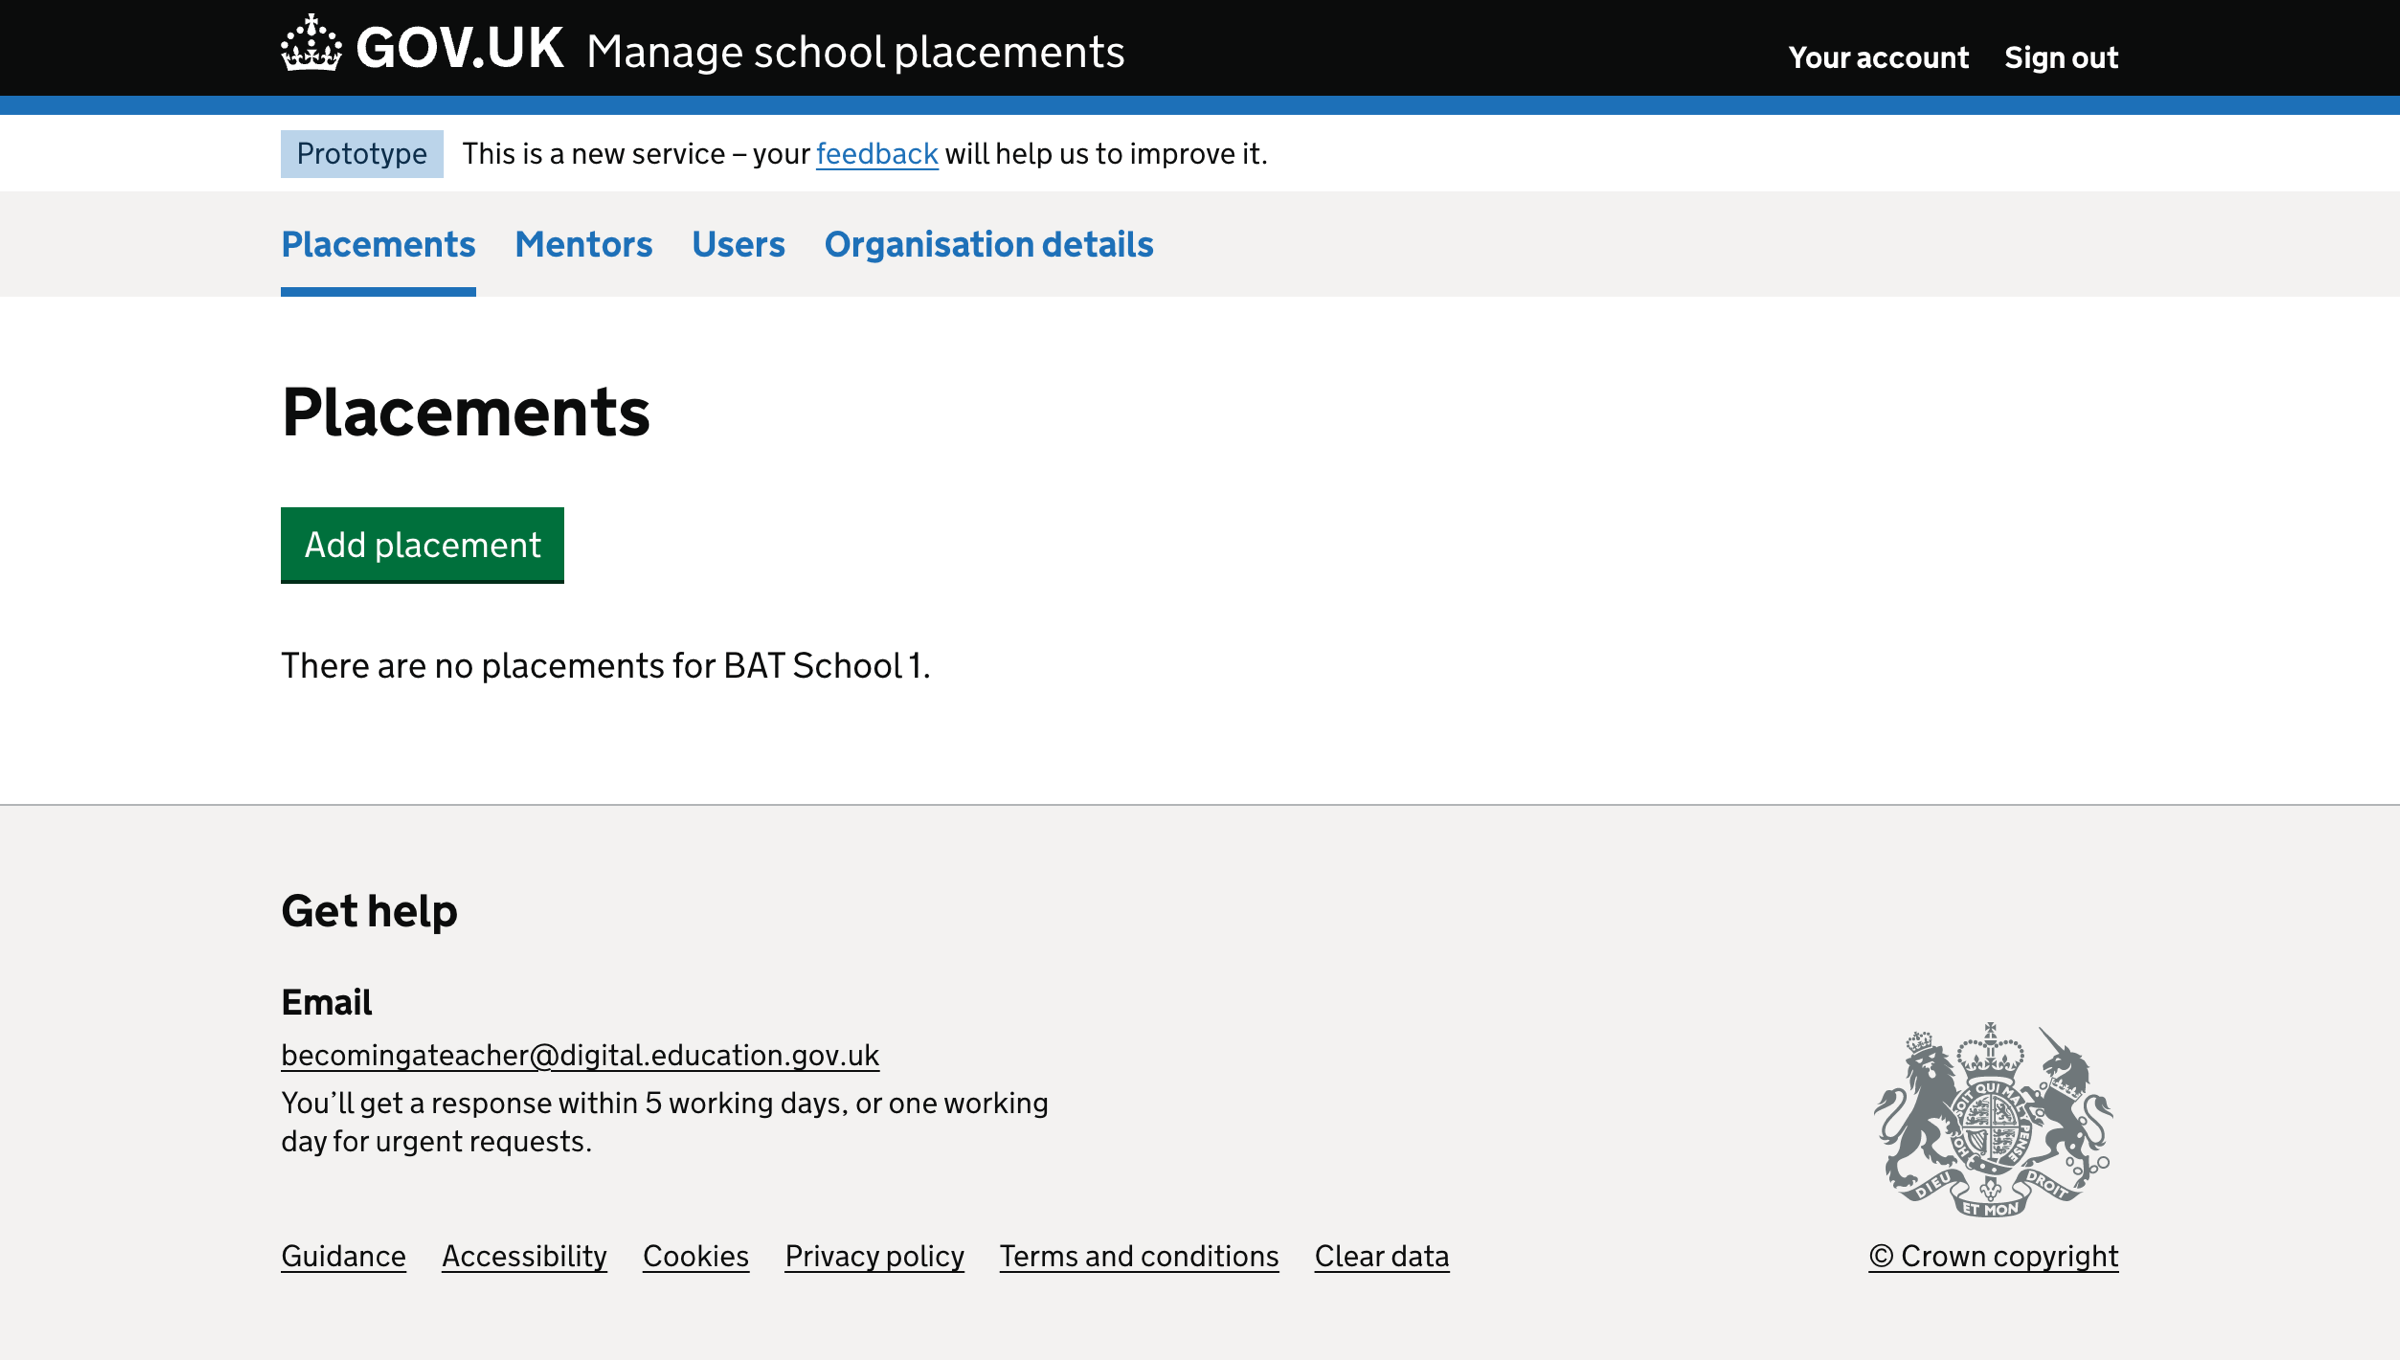
Placements list - empty#
Placements list - no mentors#

Add placement - select subject level#
Add placement - select subject level error#
Add placement - select primary subject#
Add placement - select primary subject error#
Add placement - select secondary subject#
Add placement - select select subject error#
Add placement - select mentor#
Add placement - select mentor error#
Add placement - select a mentor or ‘Not known yet’ error#

Add placement - select window#

Add placement - select window error#
Add placement - check your answers#
Add placement - success#
Placement details#
Remove placement#
Placement removed success message#